Creative textile wall art projects add warmth and texture to any space, transforming plain walls into captivating displays. Textile wall art offers a unique way to express creativity through fabrics, threads, and fibers.
Whether you’re a beginner or an experienced crafter, exploring creative textile wall art projects can bring new life to your home decor. From weaving and embroidery to fabric collage and macramé, these projects invite you to experiment with colors, patterns, and materials.
I remember starting my first textile wall hanging and feeling amazed at how simple fabric could become such a stunning piece of art. These 21 creative textile wall art projects will inspire you to craft your own textile masterpieces.
Woven Wall Hanging with Natural Fibers

Create a woven wall hanging using natural fibers like wool, cotton, and jute for a cozy, earthy look. This project combines different textures and thicknesses of yarn to add dimension and warmth to your space.
Woven wall hangings are versatile and can be customized with colors that match your décor. The process involves setting up a simple loom, weaving yarn in various patterns, and finishing with tassels or fringes.
It’s a calming activity that results in a beautiful handmade piece perfect for any room.
Steps:
- Set up a simple wooden loom or frame.
- Warp the loom with a base thread.
- Weave yarn of different colors and textures over and under the warp.
- Incorporate patterns by changing weaving techniques.
- Add tassels or fringes at the bottom.
- Secure loose ends and hang your piece.
Embroidery Hoop Art with Floral Designs
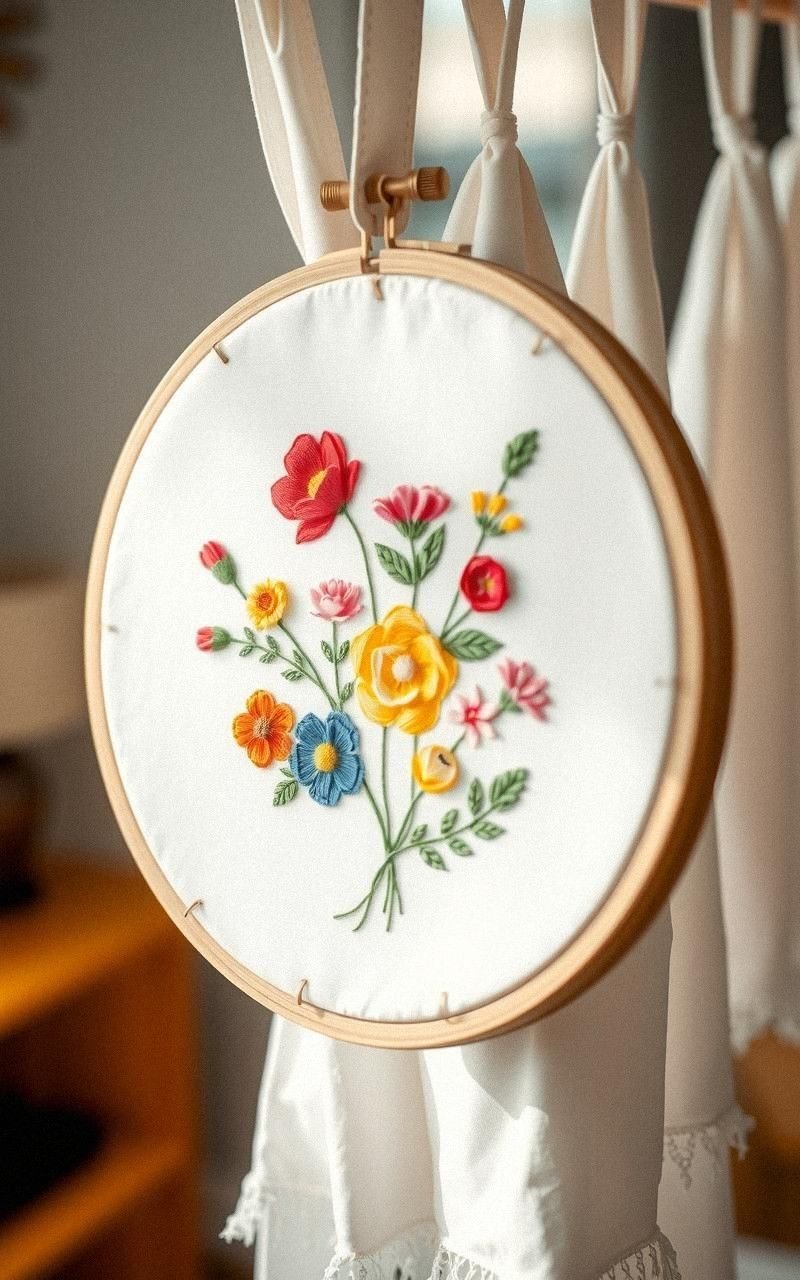
Embroidery hoop art is a simple and charming way to display textile creativity. Using embroidery floss and fabric stretched in a hoop, you can create delicate floral designs that brighten any wall.
This project is ideal for beginners and allows for endless customization in colors and patterns. Embroidered floral hoops can be grouped in sets for a gallery wall or stand alone as a subtle accent.
The tactile quality of the stitches adds a handmade touch to your home’s ambiance.
Steps:
- Place fabric tightly in an embroidery hoop.
- Sketch floral designs lightly on the fabric.
- Select embroidery floss colors.
- Use basic embroidery stitches to fill the design.
- Trim excess fabric from the back.
- Hang the hoop on your wall.
Macramé Wall Hanging with Geometric Patterns

Macramé wall hangings have regained popularity for their boho-chic aesthetic. Using knotting techniques, you can create geometric patterns that add texture and visual interest to any wall.
This creative textile wall art project requires only macramé cord and a wooden dowel or branch for support. It’s a satisfying craft that lets you play with symmetry and repetition while developing your knotting skills.
The finished piece brings a natural, artistic vibe to your living room or bedroom.
Steps:
- Cut macramé cords to desired length.
- Attach cords to a wooden dowel with lark’s head knots.
- Create geometric patterns using square and half hitch knots.
- Continue knotting following your design.
- Trim and shape the bottom fringe.
- Hang the piece on the wall.
Fabric Collage Art on Canvas

Fabric collage art involves layering and arranging fabric scraps on a canvas to form abstract or representational designs. This project offers freedom to blend colors, patterns, and textures for a one-of-a-kind textile wall piece.
Using fabric glue or sewing, you can build dimension and depth while expressing your artistic vision. Fabric collage is perfect for recycling leftover textiles and creating vibrant, tactile art that stands out on any wall.
Steps:
- Select a sturdy canvas as your base.
- Gather fabric scraps in coordinating colors and patterns.
- Cut fabric pieces into desired shapes.
- Arrange pieces on the canvas to form a design.
- Attach fabric with fabric glue or hand stitch.
- Add embellishments like buttons or embroidery if desired.
- Allow to dry or set before hanging.
Textile Tassel Garland for Wall Decoration

A tassel garland made from textile scraps adds a playful and colorful touch to any wall. This easy project involves crafting tassels from fabric or yarn and stringing them together to create a cheerful hanging decoration.
Tassel garlands can be customized with your favorite colors and hung across walls, windows, or shelves. It’s a quick way to brighten a space with handcrafted details and a joyful vibe.
Steps:
- Cut fabric or yarn into strips for tassels.
- Wrap strips around your fingers or a small object.
- Tie and trim the tassels to shape.
- Make multiple tassels in your chosen colors.
- String tassels evenly onto a sturdy cord or twine.
- Hang the garland on your wall.
Quilted Wall Art with Patchwork Squares

Quilted wall art showcases patchwork squares sewn together to create a visually appealing textile design. This project merges traditional quilting techniques with modern wall art presentation.
By selecting fabrics with complementary colors and patterns, you can construct a vibrant patchwork piece that fits your style. Quilted wall art adds texture and warmth while celebrating fabric craftsmanship.
It’s also a great way to use up fabric remnants creatively.
Steps:
- Choose fabric squares with coordinated colors and patterns.
- Arrange squares in a pleasing layout.
- Sew squares together to form a quilt top.
- Add batting and backing fabric for thickness.
- Quilt layers by stitching through all layers.
- Bind edges for a finished look.
- Mount or frame the quilted piece for hanging.
Felt Flower Bouquet Wall Art
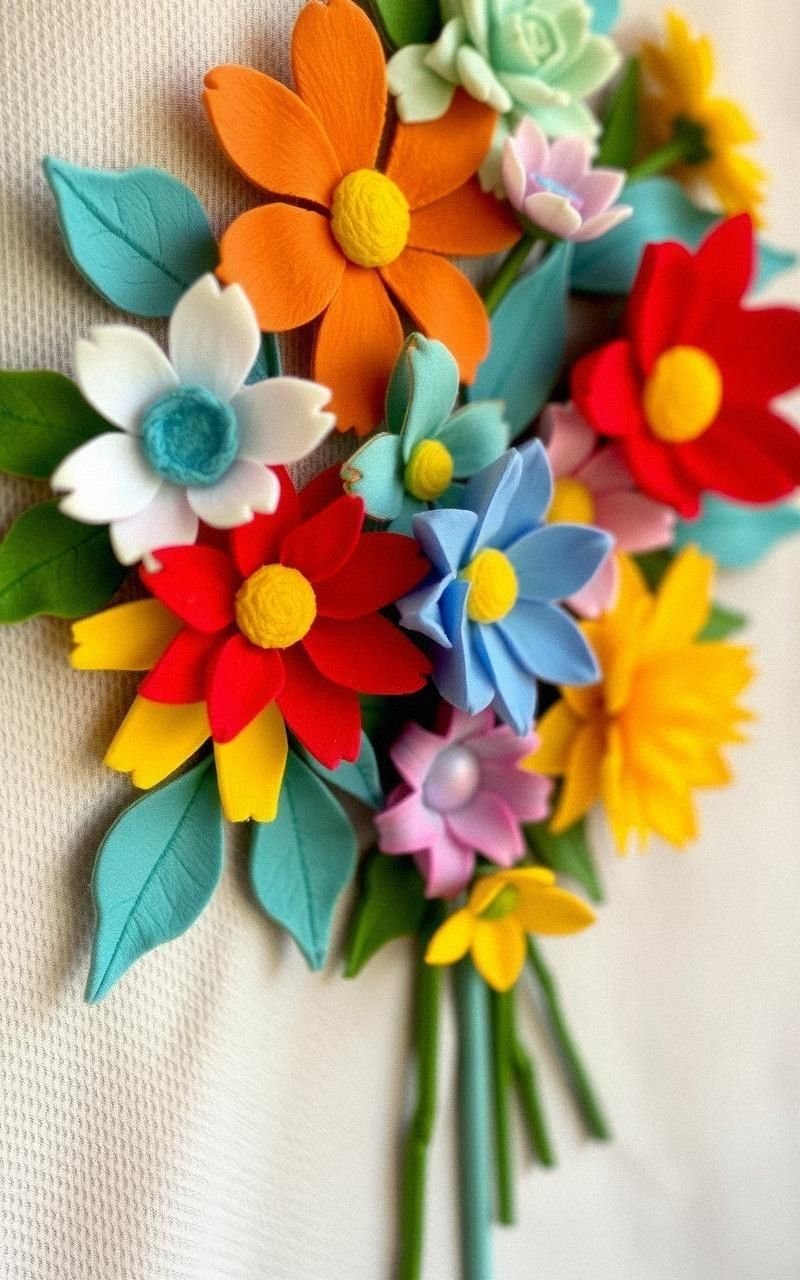
Crafting a felt flower bouquet wall art brings a touch of nature indoors without the maintenance of real flowers. Using colorful felt sheets, you can cut and assemble various flower shapes, layering them to create a lush bouquet mounted on a fabric or canvas background.
This textile project allows for endless creativity with flower types and color schemes. The soft texture of felt adds a charming and whimsical feel to your wall.
Steps:
- Select felt sheets in different colors.
- Cut flower petals and leaves from felt.
- Layer and glue or sew petals to assemble flowers.
- Attach flowers to a fabric or canvas base.
- Add stems or decorative elements as desired.
- Frame or hang the finished bouquet art.
Shibori-Dyed Fabric Wall Panels
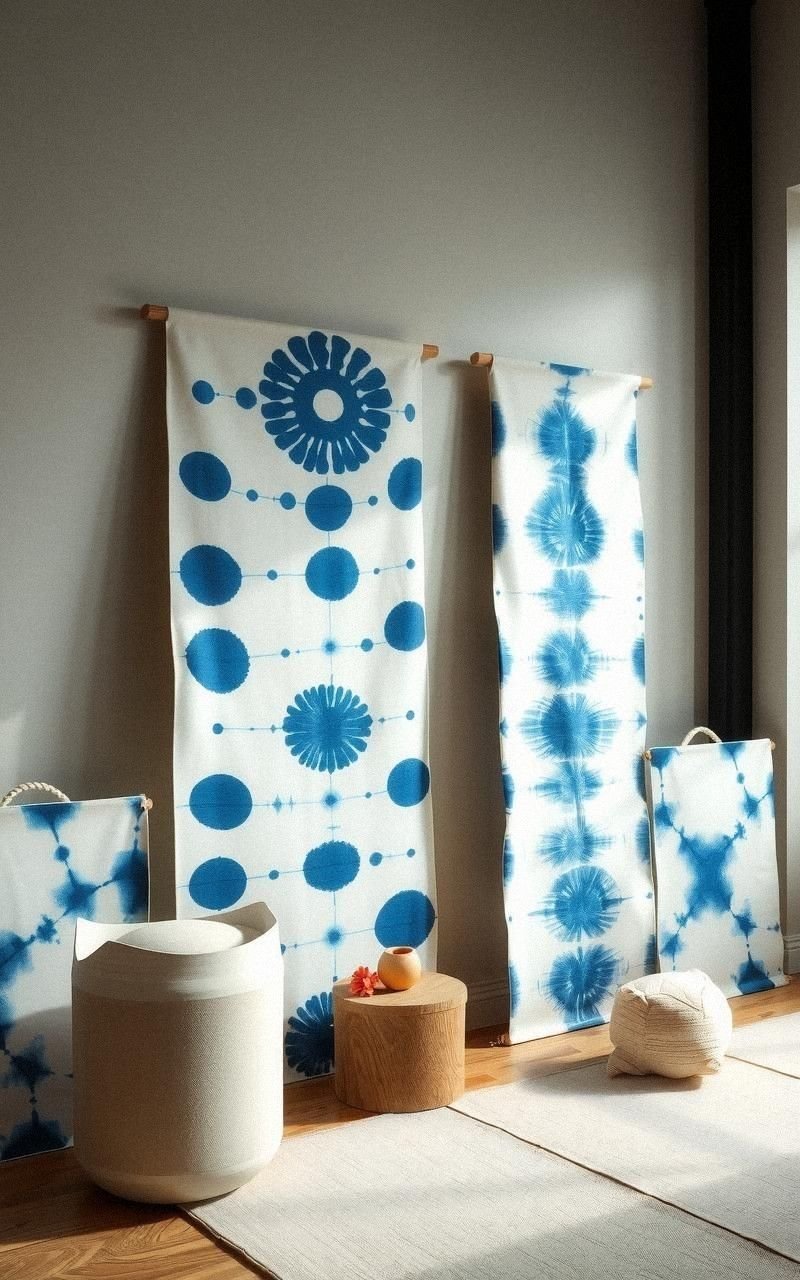
Shibori is a Japanese tie-dye technique that creates beautiful, organic patterns on fabric. Using this method, you can craft fabric wall panels with unique blue and white designs.
These textile panels can be stretched on frames or hung loosely for a striking artistic effect. Shibori-dyed textile wall art brings a handcrafted, global-inspired vibe to your space.
Experimenting with different folding and binding techniques produces varied patterns, making each piece truly unique.
Steps:
- Fold and bind fabric with rubber bands or string.
- Prepare a dye bath with indigo or fabric dye.
- Submerge fabric in the dye for a set time.
- Rinse and remove bindings carefully.
- Allow fabric to dry completely.
- Mount on frames or hang as panels.
Crochet Lace Wall Art in Vintage Style
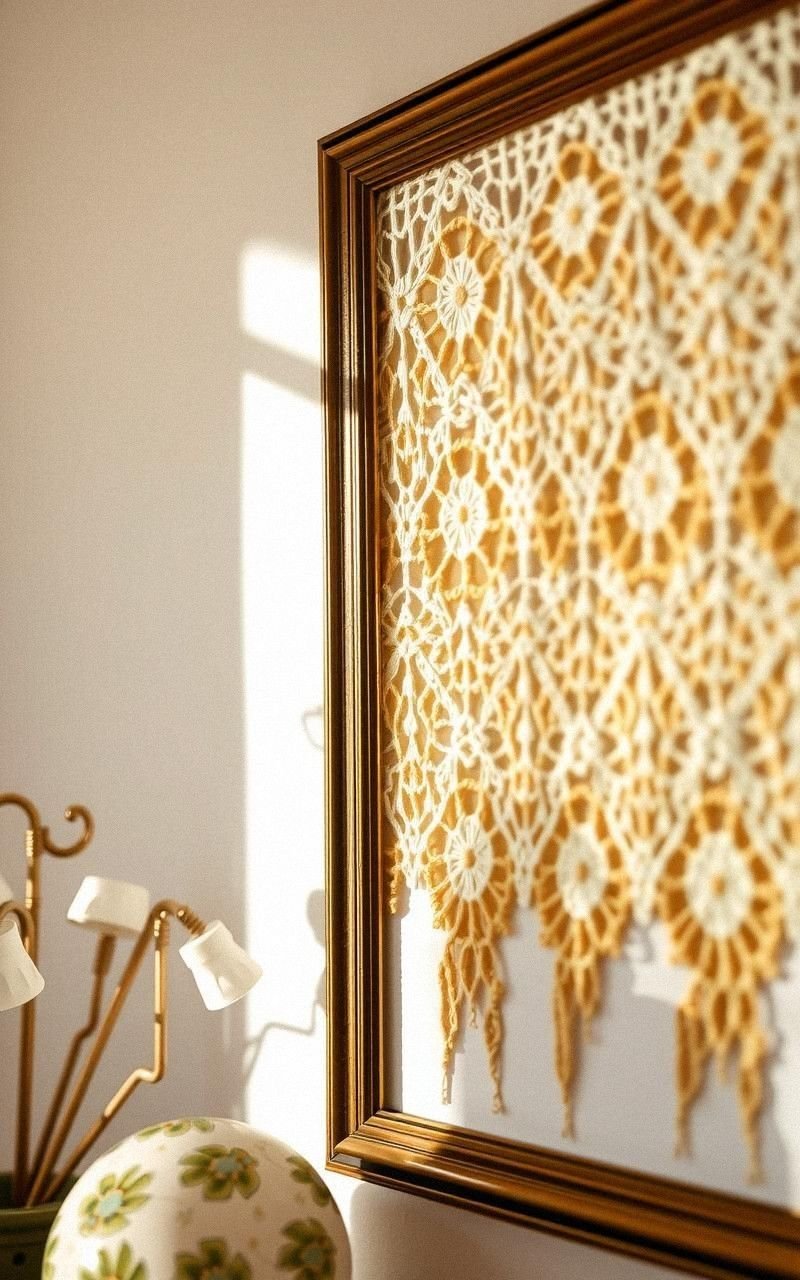
Crochet lace wall art offers a delicate and vintage-inspired textile decoration. Using fine yarn and crochet hooks, you can create intricate lace patterns that add elegance and texture to your walls.
These pieces can be framed or mounted on fabric backgrounds to highlight their detailed craftsmanship. Crochet lace wall art suits classic and shabby-chic interiors, providing a soft artistic touch.
This project requires patience but results in timeless textile beauty.
Steps:
- Select a crochet lace pattern or design.
- Use fine yarn and appropriate hook size.
- Crochet lace pieces following the pattern.
- Block lace to shape and size.
- Mount the lace on a backing fabric or frame.
- Display on your wall.
Fabric-Wrapped Wooden Letters for Wall Art

Fabric-wrapped wooden letters make personalized textile wall art that spells out names or inspiring words. This project involves covering wooden letters with fabric strips, giving a tactile, colorful finish.
It’s a fun way to add character to bedrooms, offices, or craft rooms. The fabric choice can reflect any style, from bold prints to soft pastels.
Fabric-wrapped letters can be arranged on walls or shelves for a creative display.
Steps:
- Choose wooden letters in your desired size.
- Cut fabric strips matching your color scheme.
- Wrap fabric tightly around each letter.
- Secure fabric ends with glue or stitching.
- Repeat for all letters.
- Hang or arrange letters on the wall.
Knitted Wall Panels with Chunky Yarn

Knitted wall panels made with chunky yarn create a warm and inviting textile art piece. This project uses large needles and thick yarn to produce bold stitches and texture.
The panels can be knitted flat or in patterns like cables and ribbing for added interest. These soft, tactile artworks add a cozy atmosphere to any room and are surprisingly quick to make.
Hanging knitted panels on wooden rods completes the look.
Steps:
- Select chunky yarn and large knitting needles.
- Cast on stitches for your desired panel width.
- Knit in your chosen stitch pattern (e.g., garter, cable).
- Continue until panel reaches desired length.
- Bind off and weave in ends.
- Attach panel to a wooden rod for hanging.
Appliqué Textile Wall Art with Bold Shapes

Appliqué wall art involves sewing or gluing fabric shapes onto a background to create bold and colorful designs. This project is ideal for abstract or graphic motifs that make a strong visual statement.
Using contrasting fabrics and clean lines, you can compose textiles that function as modern art pieces. Appliqué techniques allow layering and texture while keeping the process straightforward and enjoyable.
Steps:
- Choose a fabric background and cut to size.
- Cut bold fabric shapes for your design.
- Arrange shapes on the background fabric.
- Attach shapes by sewing or fabric glue.
- Add details with embroidery if desired.
- Frame or mount the textile art.
Braided Fabric Wall Hanging with Colorful Strips

Create a braided fabric wall hanging using strips of colorful fabric for a playful and textured textile art piece. This project involves cutting fabric into long strips and braiding them together, then shaping the braid into a hanging form.
It’s a simple craft that yields a vibrant and tactile decoration. Perfect for casual spaces, the braided hanging adds an element of movement and color to your walls.
Steps:
- Cut fabric into long strips of equal width.
- Group strips by color and start braiding.
- Continue braiding until you reach desired length.
- Secure braid ends with knots or stitching.
- Shape braid into a hanging form or coil.
- Attach to a dowel or hanger for display.
Loom-Knotted Wall Art with Mixed Fibers

Loom-knotted wall art combines weaving and knotting techniques on a small frame loom. Using a mix of fibers like wool, cotton, and ribbon, you can create textured, layered textile art.
This project allows experimentation with fiber types and colors, resulting in a dimensional piece that stands out. The interplay of knots and woven sections provides a unique surface that invites touch and admiration.
Steps:
- Set up a small frame loom with warp threads.
- Weave sections with different fibers and textures.
- Add knots and fringe for dimension.
- Continue alternating weaving and knotting.
- Finish edges and secure loose ends.
- Mount the piece for wall display.
Fabric Paint and Stencil Textile Panels

Using fabric paint and stencils, you can create textile panels that combine painting and fabric art. This project involves selecting fabric panels and applying painted patterns using stencils for precise shapes and repetition.
The painted textile panels can be framed or hung as is, adding graphic and colorful elements to your walls. This method opens up possibilities for customizing textiles with any motif or color scheme.
Steps:
- Choose fabric panels or cut fabric to size.
- Select or create stencils with desired patterns.
- Secure stencil on fabric and apply fabric paint.
- Repeat for multiple panels or layers.
- Allow paint to dry thoroughly.
- Frame or hang the painted textile panels.
Knotted Yarn Wall Art with Ombre Colors

Knotted yarn wall art featuring ombre colors creates a stunning gradient effect with simple knotting techniques. This project uses yarn in varying shades of a color to form a flowing textile design.
By tying large knots or loops on a backing, you build texture and visual interest. The ombre transition adds elegance and movement, making the piece a beautiful focal point for any wall.
Steps:
- Select yarn in a gradient of shades.
- Cut yarn into equal lengths.
- Tie knots or loops onto a fabric or wooden backing.
- Arrange knots to create an ombre effect.
- Trim and shape yarn ends for a neat finish.
- Attach hanging hardware and display.
Textile Shadow Boxes with Layered Fabrics

Create textile shadow boxes by layering fabrics inside deep frames to add depth and dimension to wall art. This project allows you to combine textures, colors, and small fabric elements like buttons or lace within a three-dimensional display.
Each shadow box becomes a miniature textile scene or abstract composition. These pieces enhance wall décor by offering tactile and visual interest from multiple angles.
Steps:
- Choose shadow box frames with depth.
- Select layered fabrics and embellishments.
- Arrange fabrics inside the frame for composition.
- Secure layers with glue or stitching.
- Add decorative elements like buttons or beads.
- Close frame and hang on the wall.
Patchwork Felt Animal Silhouettes
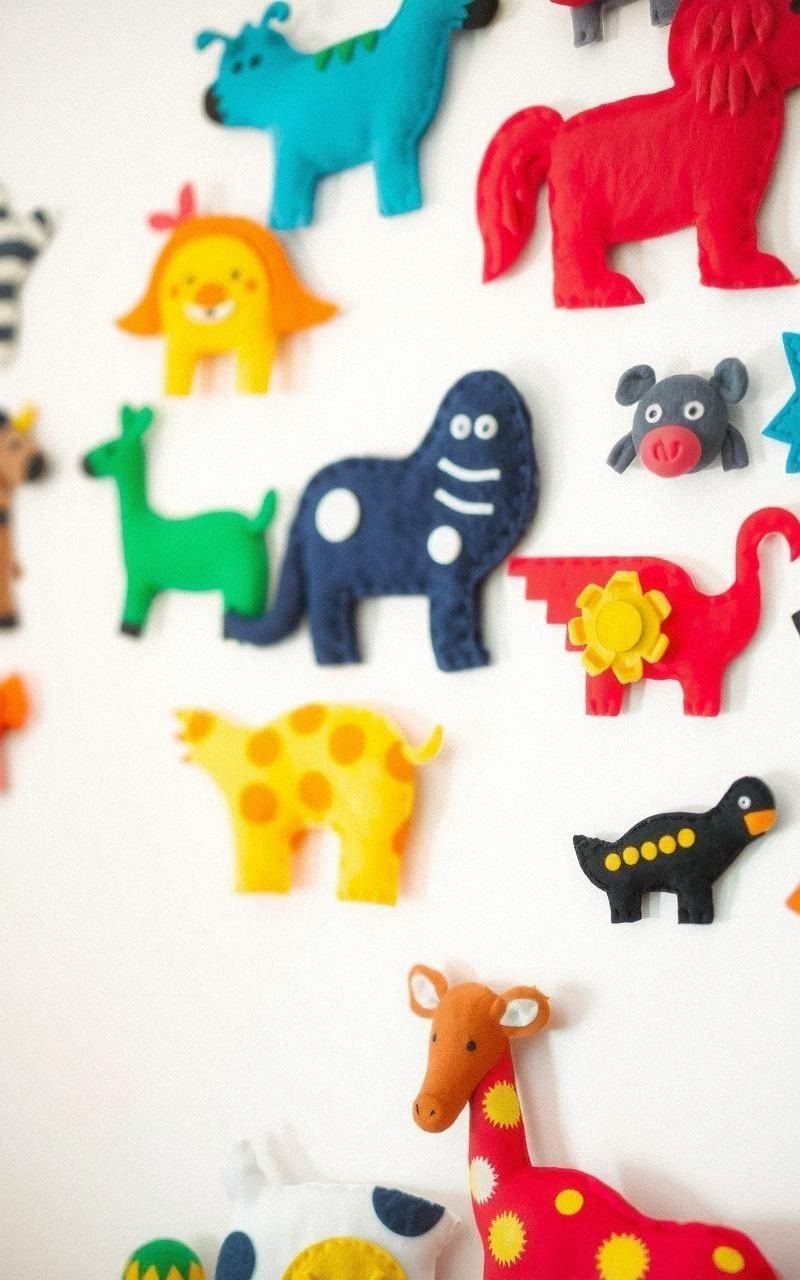
Patchwork felt animal silhouettes are playful textile wall art pieces that combine cut felt shapes in patchwork style to form animals or creatures. This project is great for kids’ rooms or whimsical décor.
Using bright felt colors and simple shapes, you create charming silhouettes that can be framed or mounted on fabric backgrounds. Patchwork felt art is easy to make and visually delightful.
Steps:
- Cut animal silhouette shapes from felt sheets.
- Cut smaller felt patches for patchwork.
- Arrange and glue patches onto animal shapes.
- Mount finished silhouettes on a fabric background.
- Frame or hang pieces individually or as a set.
Tie-Dyed Textile Wall Scrolls

Tie-dyed textile wall scrolls bring vibrant color and movement to wall art. Using tie-dye techniques on long fabric pieces, you create bold patterns that are then hung as scrolls or banners.
This project lets you experiment with bright color combinations and folding methods to achieve unique effects. Textile scrolls made with tie-dye add a casual, artistic flair to your space and are easy to swap with the seasons.
Steps:
- Prepare long fabric strips or panels.
- Fold and bind fabric using tie-dye techniques.
- Apply dye colors and let set.
- Rinse and dry fabric thoroughly.
- Attach fabric to wooden rods or dowels.
- Hang scrolls vertically on the wall.
Hand-Stitched Quote Textile Wall Art

Hand-stitched quote textile wall art combines fabric and embroidery to display meaningful words or phrases. This project involves selecting a fabric base and stitching letters by hand to create a personal and inspirational piece.
You can use simple backstitch or chain stitch for the text, adding decorative elements around the letters if desired. The tactile nature of stitching makes the words feel heartfelt and unique on your wall.
Steps:
- Choose fabric and stretch in an embroidery hoop.
- Write or print your quote as a guide.
- Select embroidery thread colors.
- Stitch letters using backstitch or chain stitch.
- Add decorative stitches or motifs if desired.
- Frame or hang the embroidered fabric.
Knotted Fringe Wall Art with Natural Jute

Knotted fringe wall art made from natural jute adds rustic texture and a handcrafted look to your walls. This project involves cutting jute into long strips, knotting them creatively, and leaving fringed ends for a bohemian feel.
Its neutral tones complement many interior styles, especially farmhouse or coastal themes. The combination of knots and fringe creates an inviting tactile element that enhances any room.
Steps:
- Cut natural jute into long strips.
- Tie strips into knots or patterns.
- Arrange knots in a row or design on a wooden dowel.
- Leave ends as a fringe, trimming uneven parts.
- Secure knots and attach hanging hardware.
- Display on your wall.