
187Pcs Professional All-in-One Art Painting Kit
I’ve always loved the quiet cheer of pastel spring garland crafts, the way soft colors and gentle shapes can brighten a windowsill or mantel. Making a strand of tiny blooms or beads has felt like a small, comforting ritual on slow afternoons, pulling out scraps and watching a simple idea take on light and movement.
These pastel spring garland crafts sparked afternoons of fiddly happiness for me, filling the house with a whisper of seasonal color and texture.
Each project carried a different mood, from breezy and airy to cozy and tactile, and each finished strand seemed to find its own little corner to glow.


Paper flower garland with soft pastel blooms

I remember the first time a paper flower garland brightened my kitchen window; the paper felt thin and slightly crinkly, borrowing the warmth of afternoon light. Petals in powder pink, lemon and mint hovered like tiny cloud shadows, their edges catching the breeze.
The whole piece moved with a gentle rustle that made me smile when cups clinked nearby. I liked how the pastel palette kept things calm, and how each bloom seemed familiar yet fragile, almost like a memory translated into color and texture.
Steps
- Gather lightweight pastel papers, floral wire or thread, and a selection of small floral templates.
- Form petal shapes from the paper and layer them into bloom shapes, fastening centers with small beads or glue dots.
- String blooms along a length of thread or thin wire with even spacing, leaving extra length at each end for hanging.
- Trim stray edges and gently curve some petals to give the garland a natural, airy silhouette.
Felt bunny garland for mantel smiles
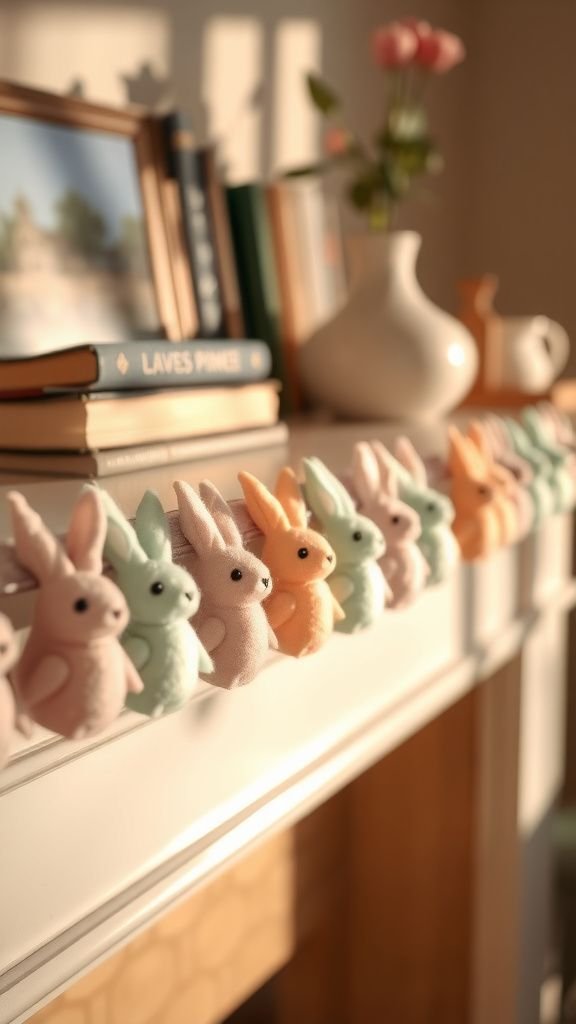
There was a mantel that felt plain until a line of felt bunnies appeared, each one squat and soft in muted pastels. The wool felt had a tiny, comforting fuzz under my fingertips, and the animals’ rounded shapes read like a collection of friendly secrets.
Hues of peach, seafoam and lavender made the row feel playful without loudness, and the tiny embroidered faces added a homemade charm. When the room dimmed, those little bunnies kept a quiet presence, like small companions watching over cups and books.
Steps
- Choose soft wool felt in pastel shades and sketch small bunny silhouettes onto paper for templates.
- Trace templates onto felt and cut paired shapes, leaving small openings for stuffing.
- Lightly stuff each bunny, close openings with neat stitches, and add embroidered eyes and noses.
- Thread the finished bunnies onto a length of twine or ribbon with even spacing and secure the ends for hanging.
Airy pompom chain in powdery hues
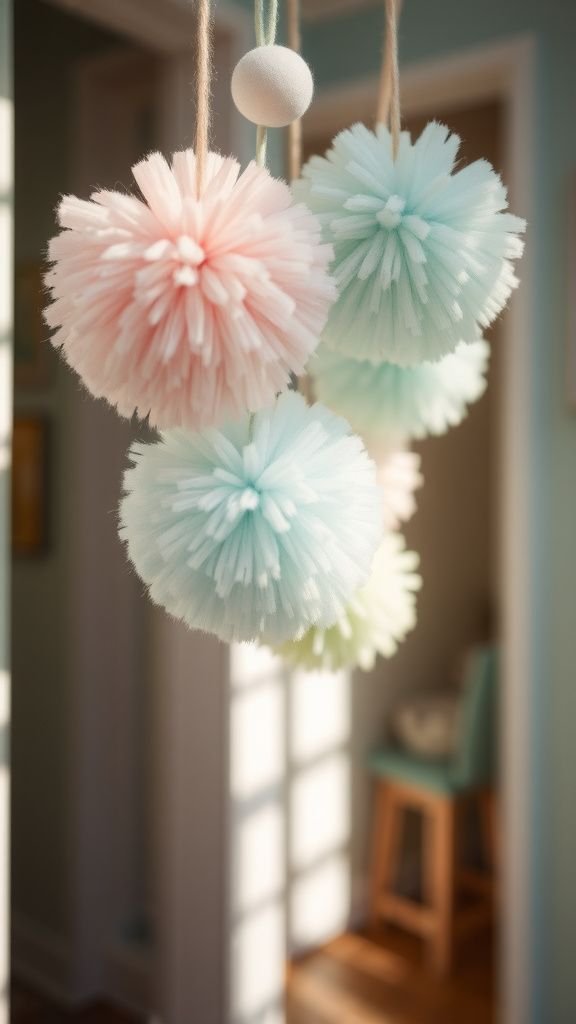
The pompom chain felt like holding bits of cloud, each puff a small, tactile delight that begged to be squeezed. Yarn in subdued pastels made the pompoms soft rather than loud, and their fluffy edges created a lovely halo where they brushed one another.
Hung along a doorway, they produced a muffled whisper when the breeze nudged them, and the overall silhouette read as playful yet understated. I enjoyed how the tactile quality invited fingers to linger, tracing the soft contours while sunlight warmed the fibers.
Steps
- Wind pastel yarn around a pompom maker or cardboard template until full, then tie tightly at the center and trim edges for a fluffy shape.
- Repeat to create a collection of evenly sized pompoms in a mix of complementary pastel shades.
- Thread a strong needle with yarn and pierce through the center of each pompom, sliding them along to form a chain.
- Knot the yarn ends and trim any loose fibers for a neat, cohesive look.
Save time and printer ink with 50+ printable templates and step-by-step instructions in one ad-free guide.

Just $19.99 — lifetime access
Tassel and ribbon pastel streamer garland

A string of tassels and ribbons turned a corner into a tiny celebration, each strip whispering as it drifted. The crepe ribbons had a fine tooth that rustled faintly, while silky ribbons gleamed where light hit.
Color gradations moved from the palest peach into cool lavender and soft blue, making the whole arrangement feel like a slow ombré. I liked the contrast between the crisp tassel edges and the flowing ribbons, and how the garland transformed ordinary air into a playful, layered texture that swayed with household rhythms.
Steps
- Select ribbons and crepe paper in a coordinated pastel palette and cut them to varying lengths for visual interest.
- Create tassels by folding and securing strips at the top, finishing with a small wrap to form the head.
- Attach tassels and ribbon strips to a central cord by looping or knotting to achieve evenly spaced clusters.
- Hang the garland from hooks or nails, adjusting cluster spacing until the movement feels balanced.
Delicate leaf garland with watercolor wash
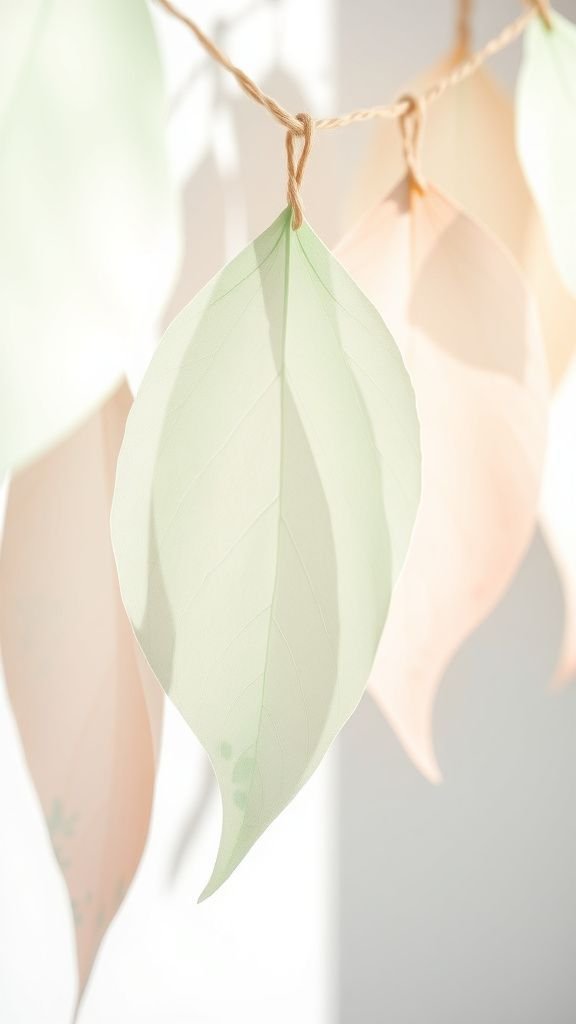
The watercolor leaf garland had a painterly softness that felt less like decoration and more like a study in gentle colors. Each paper leaf carried a translucent wash, where pigment pooled along veins and faded toward edges.
They felt papery and fragile in a way that invited care, and when a breeze passed they made a faint fluttering sound. Hues ranged from pea-green to a washed mint and a hint of blush, and the whole strand read like a quiet sketch of an early garden.
Steps
- Paint sheets of lightweight paper with diluted watercolor washes in a pastel palette, allowing areas of bloom and fade.
- Once dry, cut leaf shapes from the painted paper and create subtle creases to mimic natural veins.
- Punch small holes near the tops of each leaf and string them along thin twine, spacing for an airy look.
- Hang the garland where gentle drafts can make the leaves flutter and catch the light.
Mini origami crane garland floating on thread
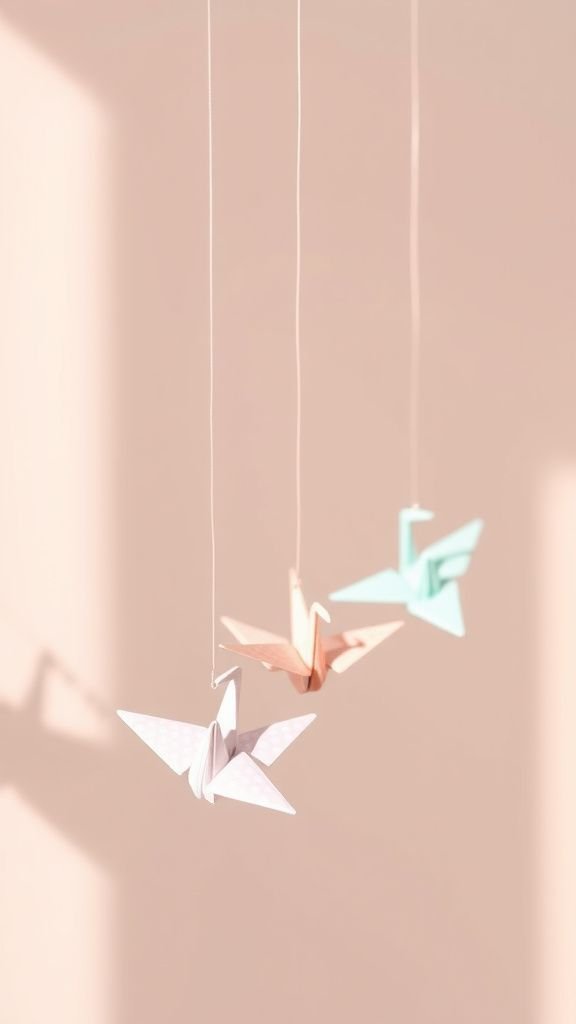
A row of tiny origami cranes brought a playful patience to a narrow shelf, each one folded small enough to fit on a fingertip. The pastel patterned papers had faint motifs and a smooth sheen that caught the light at angles.
There was a quiet satisfaction watching the line catch reflections and seem to float, like a little murmuration frozen in motion. Their crisp edges contrasted with the softness of nearby textiles, and the repetition of forms felt meditative, a small chorus of paper wings waiting to stir.
Steps
- Select lightweight pastel patterned paper and fold small origami cranes using a compact square template.
- Make a collection of evenly sized cranes, ensuring crisp folds and pointed wings for consistent appearance.
- Thread each crane onto clear nylon or thin thread by passing through the body center, spacing them along the line.
- Secure the thread ends and hang the garland so the cranes appear to float and catch light.
Egg-shaped paper lantern garland, soft glow

An egg-shaped paper lantern garland lent an almost lantern-like hush to the evening, each hollow shape catching light from within. The paper had a gentle translucency so that the pastel tones felt luminous rather than flat, and the subtle overlap of paper fibers showed where color deepened.
From a short distance they glowed like tiny moons, bathing the corner in a warm wash. The overall effect was quietly festive, the shapes referencing spring rituals without any fuss, and the light felt comforting during late afternoons and early dusks.
Steps
- Prepare lightweight paper or lantern sleeves in pastel shades and form them into small egg-shaped hollow forms.
- Insert small LED lights into each hollow form, ensuring heat-free illumination and secure placement.
- Space the lanterns along a length of wire or cord and attach each lantern so the lights remain centered.
- Test the lighting in low light and adjust spacing for an even, gentle glow.
Fabric scrap bunting in muted pastel tones

A bunting made from fabric scraps felt like a stitch diary, each triangle a tiny fragment of past projects and memories. The cottons and linens had a lived-in softness and tiny frays at edges that added character, while the pastel palette kept the mix orderly.
The bunting had a pleasant weight that made it hang steadily, and when light shifted the different fabrics reflected it in varied ways, some matte, some faintly lustrous. It gave the space a cozy, collected air, like a cherished shelf of folded linens.
Steps
- Collect fabric scraps in coordinating pastel tones and cut them into uniform bunting shapes.
- Layer each piece and finish top edges with a narrow hem or binding to prevent fraying.
- Sew or affix the bunting pieces along a bias tape or cord, spacing them for a balanced rhythm.
- Hang the bunting across a mantel or window and adjust lengths for visual flow.
Dried flower and lace heirloom garland

Putting together a garland of dried flowers and lace felt like holding a little family memory; the dried petals had papery crispness and a faint, dry aroma that reminded me of old books. Lace snippets threaded between small bundles added a vintage softness, their patterns catching light and creating delicate silhouettes.
The palette leaned toward soft creams, faded pinks and wheat, and the overall impression was of quiet age and care. Hung low above a table, it brought a gentle, nostalgic character that made the room feel like a slow afternoon.
Steps
- Gather small dried flower stems and vintage lace pieces in complementary pastel and neutral tones.
- Bundle tiny bunches of dried flowers and wrap lace strips around their stems to form decorative clusters.
- Attach clusters to a length of twine or ribbon at regular intervals, securing with small ties.
- Hang the garland in a place sheltered from direct sunlight to preserve colors and texture.

188Pcs All-in-One Art Painting Kit

Caydo Automatic i Cord Knitting Machine
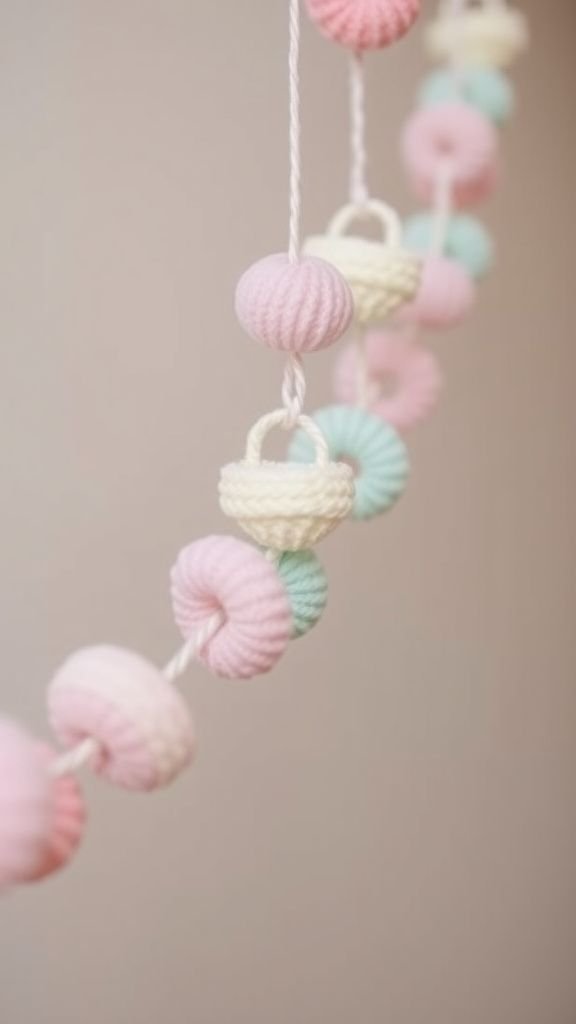
Clay bead pastel necklace-style garland for mantel

A string of hand-formed clay beads felt pleasantly tactile, each bead slightly different in shape and finish. The clay had a matte, cool-to-the-touch quality that contrasted with nearby textiles, and the pastel glazes pooled in tiny variations where thumbs met the clay.
There was a slow rhythm to the bead line, a mix of round and slightly flattened forms that caught light on edges. Draped across a mantel, the garland felt sculptural and quiet, a little row of thumb-sized ornaments that invited a second look.
Steps
- Condition air-dry clay and shape beads into a mix of rounds and flattened discs in soft pastel hues.
- Allow the beads to dry fully, then apply thin washes of pastel paint or glaze for color variation.
- Drill or pierce holes through the centers and string beads along durable cord or twine with balanced spacing.
- Tie off the cord and arrange the garland to drape naturally across the mantel.
Crochet granny squares strung like a memory
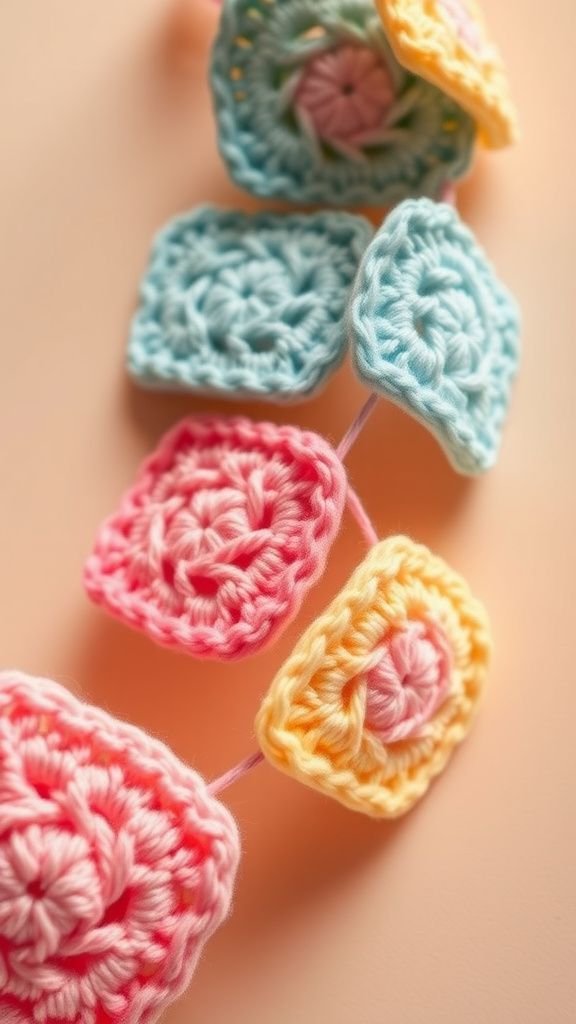
A line of tiny crochet granny squares felt like a compact scrapbook of yarn and afternoons. Each square held a familiar halo of stitches that caught small specks of color, and the soft cotton yarn had a cozy, textured feel under fingertips.
Pastel combinations made the squares whisper rather than shout, and the repetition of the stitched motifs offered a comforting visual rhythm. When light grazed the yarn, tiny shadows fell into the stitch hollows, giving the strip a gentle depth that made the garland feel warm and hand-held.
Steps
- Crochet a series of small granny squares using soft cotton yarn in complementary pastel shades.
- Block the squares gently to even out shape and ensure consistent sizing across the collection.
- Join the squares along a length of yarn or ribbon, connecting corners or edges in a pleasant sequence.
- Hang the garland where the texture can be seen up close, allowing stitch shadows to add depth.
Macramé pastel arcs with tiny shells
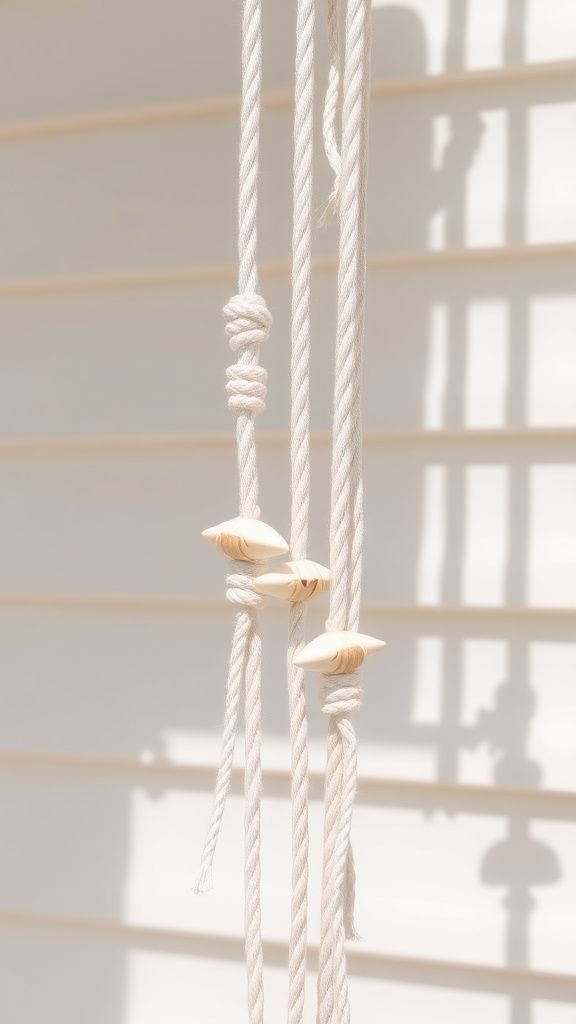
A macramé garland with pastel cords and tiny shells felt like a seaside afternoon folded small. The cords had a soft ropey texture and the knots created little ridges that caught light.
The shells added a smooth, cool contrast and a whisper of beach memory, while gentle pastel cords kept the piece understated. Hung near a porch, the arcs made small, rhythmic shadows against sunlit siding and produced a muted clacking when wind moved them.
It felt like a hand-shaped fragment of shoreline brought into a cozy corner.
Steps
- Prepare pastel cotton cords and a selection of small shells or beads to incorporate into the design.
- Tie decorative macramé knots to form small arcs or segments, leaving spaces for shell placement.
- Thread shells onto cord or secure them within knot clusters at planned intervals.
- Attach the segments along a main cord and hang in a breezy spot where gentle movement reveals texture.
Sequin-sparkle pastel star garland for windows
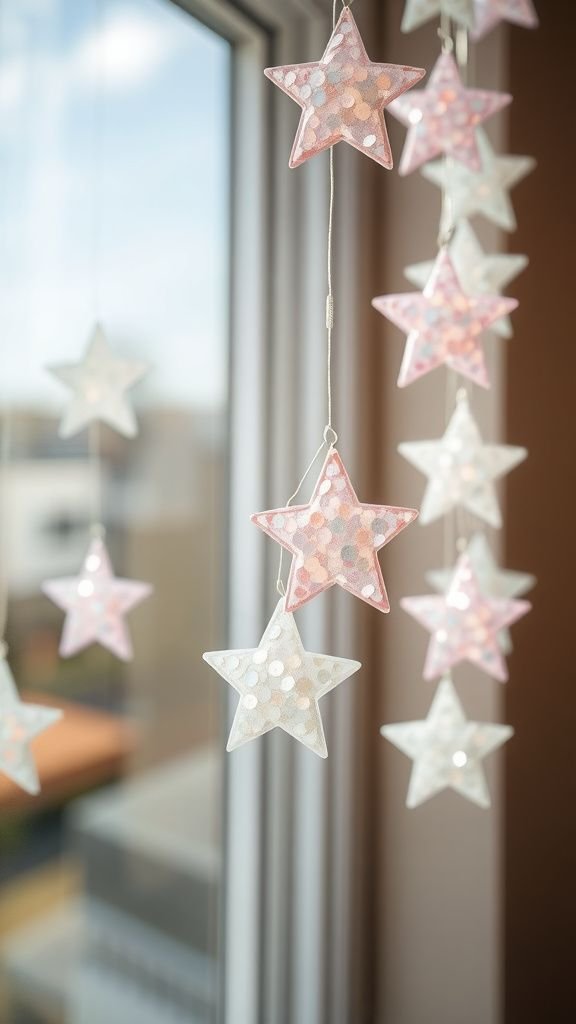
A star garland stitched with pastel sequins turned ordinary light into tiny glints that felt cheerful without being flashy. The sequins had a faint metallic sheen that shifted with movement, and small threads captured them like constellations along a line.
Hanging in a window, they caught morning rays and cast miniature reflections across a table, bringing unexpected speckles of color. The stars themselves were modest in size, which made the whole strand feel delicate and joyful, a sprinkle of tiny, twinkling moments during daylight hours.
Steps
- Cut small star shapes from stiffened fabric or paper and cover their surfaces with pastel sequins by sewing or adhesive.
- Reinforce star centers and punch tiny holes for threading to prevent tearing.
- String stars along clear thread or thin cord, spacing them to allow light to interact with each sequin surface.
- Hang the garland in a sunny window where sequins can catch rays and create gentle reflections.
Pressed wildflower translucent strand for sunlit sills
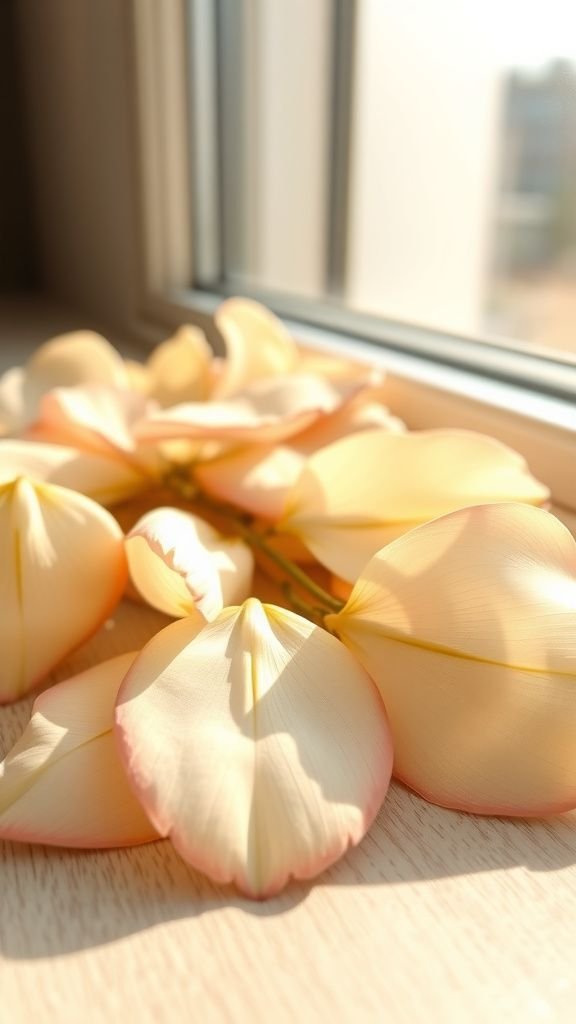
A strand of pressed wildflowers felt like a fragile botanical sketch, each petal flattened to a delicate translucence. The flowers had the whispery feel of tissue paper with veins that showed through like faint pencil lines.
When the strand crossed a sunny patch on the sill, pigments glowed softly as if lit from within, and shadows cast delicate silhouettes on the wood. The palette was subtle—pale ivory, blush and buttery cream—and the arrangement felt reverent, like a small study of a single walk through a garden earlier in the week.
Steps
- Press small wildflower specimens between absorbent paper until thoroughly dry and flat.
- Sandwich each pressed flower between two pieces of clear plastic or glassine to protect and stabilize them.
- Punch tiny holes in protected edges and thread flowers along a thin, transparent line, spacing to allow gentle overlap.
- Secure ends and drape the strand across a sunny sill where backlighting reveals petal translucence.
Watercolor paper ribbon garland with soft edges

A ribbon garland made of watercolor paper felt like painting a breeze into being. Each ribbon had feathered edges where pigment met water, and the surface held granulated color patches that made the strips look hand-dyed.
The paper carried a gentle stiffness that allowed the ribbons to curve softly rather than hang limply, and light played along the color gradients. The palette leaned pale and airy, so the whole strand read like a long, fluttering brushstroke across the room, subtle and pleasantly painterly.
Steps
- Paint long strips of watercolor paper with diluted washes to create soft gradients and allow them to dry flat.
- Cut the strips into ribbon-like lengths, leaving edges slightly irregular for a hand-painted look.
- Attach the paper ribbons to a supporting cord by folding over or gluing securely at the top edge.
- Hang the garland in a space where the painted edges can be admired and catch gentle light.
Beaded tassel garland with muted wooden beads

Combining beaded segments with tassel drops created a satisfying contrast of smooth and fibrous textures. The wooden beads had a warm matte finish and carried a faint scent of raw wood when handled, while the pastel tassels brought a soft, flowing movement.
Arranged with alternating spacing, the garland felt measured and relaxed, like a string of small charms collected during slow afternoons. The overall palette stayed gentle, allowing the wood grain and the tassel fibers to stand out and give the piece an earthy, approachable personality.
Steps
- Select muted wooden beads and prepare pastel tassels with neat heads and full skirts.
- Thread beads onto strong cord, leaving intervals for tassel placement and sliding beads tight for stability.
- Attach tassels by knotting or looping them at planned positions between bead clusters.
- Finish cord ends securely and adjust bead/tassel spacing for a balanced visual rhythm.
Crepe-paper streamer canopy garland above brunch table

A canopy of crepe-paper streamers created a playful sense of enclosure above the brunch table, the paper’s fine texture making the colors feel slightly worn and gentle. The streamers overlapped in a soft edgeless way, producing translucent layers of blush and pale lemon that filtered the light.
There was the faint, pleasant sound of paper shifting when plates moved, and the streamers moved with a slow, buoyant rhythm when anyone passed beneath them. The overall effect read like a suspended confetti cloud, light and quietly celebratory.
Steps
- Choose crepe paper in coordinating pastel shades and cut into long streamer lengths of varying widths.
- Gather several streamers together and secure their tops to a central line or hoop to create canopy clusters.
- Space the clusters evenly above the table and attach the main line to ceiling points or supports.
- Arrange streamer lengths so they overlap gently, creating soft color blends overhead.
Sweet clay bunny and egg garland for corners
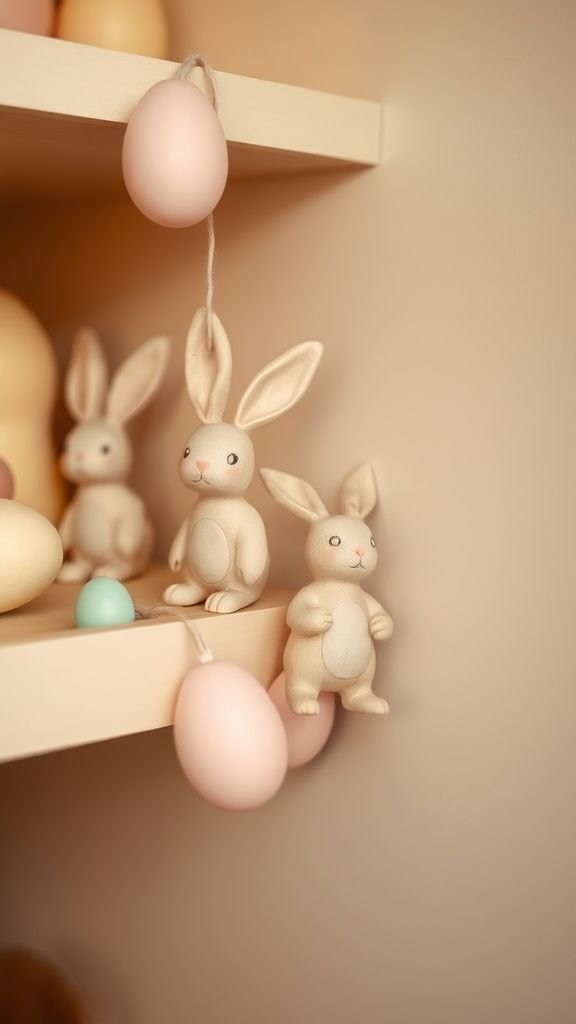
A garland of tiny clay bunnies and eggs had a quiet, toy-like quality, each figure small enough to rest in the palm. The clay surfaces were slightly cool and matte, with pastel washes pooled in shallow crevices.
The little shapes carried a tactile honesty—fingerprints and slight asymmetries that made them feel handcrafted. Arranged along a string, they read like a miniature parade, and placing them in a small corner gave that spot a gentle, whimsical identity that made me pause and smile on morning routes through the house.
Steps
- Shape small bunny and egg forms from air-dry or polymer clay and smooth surfaces gently with fingertips.
- Allow clay to dry or bake according to material instructions, then apply thin pastel paints or glazes for color.
- Pierce holes through each figure before finishing so they can be threaded, then string them along cord with even intervals.
- Secure ends and position the garland in a cozy corner or along a bookshelf ledge.
Scented lavender sachet garland that whispers spring
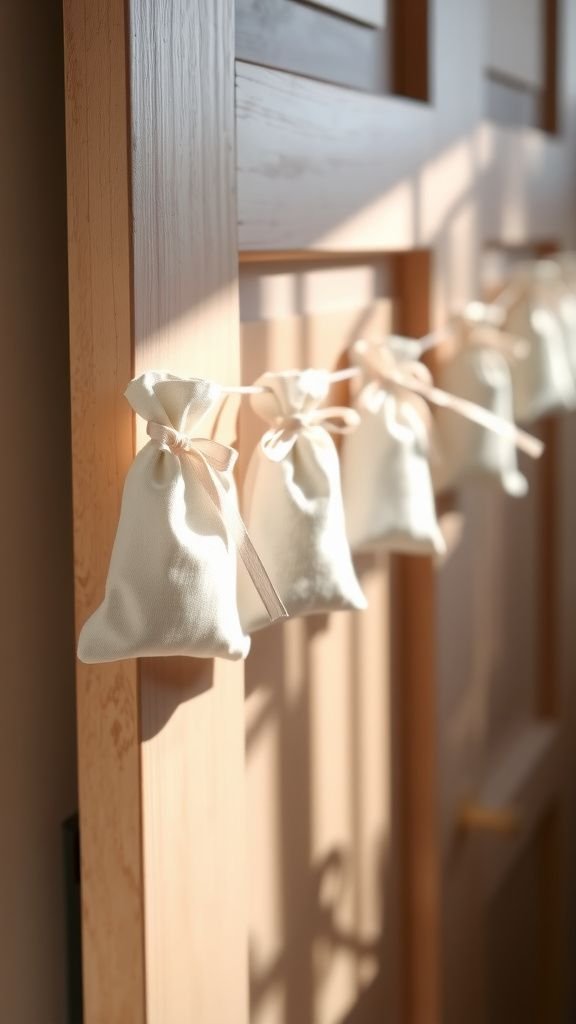
A garland of tiny lavender sachets brought a soft, herbaceous note to the room, a delicate aroma that felt calming rather than bold. The sachets’ linen fabric had a dry, tactile finish and the lavender buds inside made a faint, comforting rustle when the strand moved.
Pastel fabric tones kept the visual quiet, while the scent added another layer of memory to a doorway or armoire. It was the kind of garland that made drawers and breath feel gentler, and small whiffs of scent surfaced whenever a draft moved through.
Steps
- Sew small linen sachets and fill them with dried lavender buds, securing each with a tidy seam or closure.
- Arrange sachets in a pleasing sequence of pastel fabrics and tie or stitch them onto a supporting cord at even intervals.
- Ensure sachet seams are secure so filling remains contained during handling.
- Hang the garland near wardrobes or doorways where the gentle aroma can drift through the room.
Mini pompom wreath link garland, playful touch
A chain of mini pompom wreaths felt delightfully compact, each tiny loop a little halo of color. The yarn had a soft, springy bounce and the wreaths, when linked, created a pleasing rhythm that read like a string of tiny rings.
The pastel mix kept the whole look gentle, and the mini scale made the garland suitable for narrow spaces and delicate displays. When sunlight hit the yarn fibers they shimmered with a subtle glow, and the whole piece added a playful, handcrafted punctuation to shelves and small wall nooks.
Steps
- Create small pompoms and shape them into tiny wreaths by securing yarn ends around a circular base.
- Connect individual pompom wreaths by looping a yarn tail through the next wreath to form a linked chain.
- Continue linking until the garland reaches the desired length and fasten the final connection securely.
- Trim stray fibers for a neat finish and place the garland on a narrow shelf or frame.
Twine and pastel bead minimalist spring garland

A minimalist garland of twine and spaced pastel beads spoke in small, quiet phrases. The natural twine had a slightly rough, fibrous texture while the beads offered smooth, cool contrast.
Colors were muted and used sparingly so each bead felt like a small punctuation mark along the line. The overall presence was restrained and versatile, able to tuck into a modern shelf or hang across a tiny frame.
I liked how the simplicity left room for surrounding objects to breathe and how gentle shadows from the beads added subtle depth.
Steps
- Choose a sturdy natural twine and a selection of matte pastel beads in coherent sizes and hues.
- Thread beads onto the twine at chosen intervals and secure each bead in place with small knots.
- Continue along the length until the composition feels balanced, then finish twine ends for hanging.
- Drape the garland over a shelf or frame to enjoy its minimalist rhythm and shadow play.