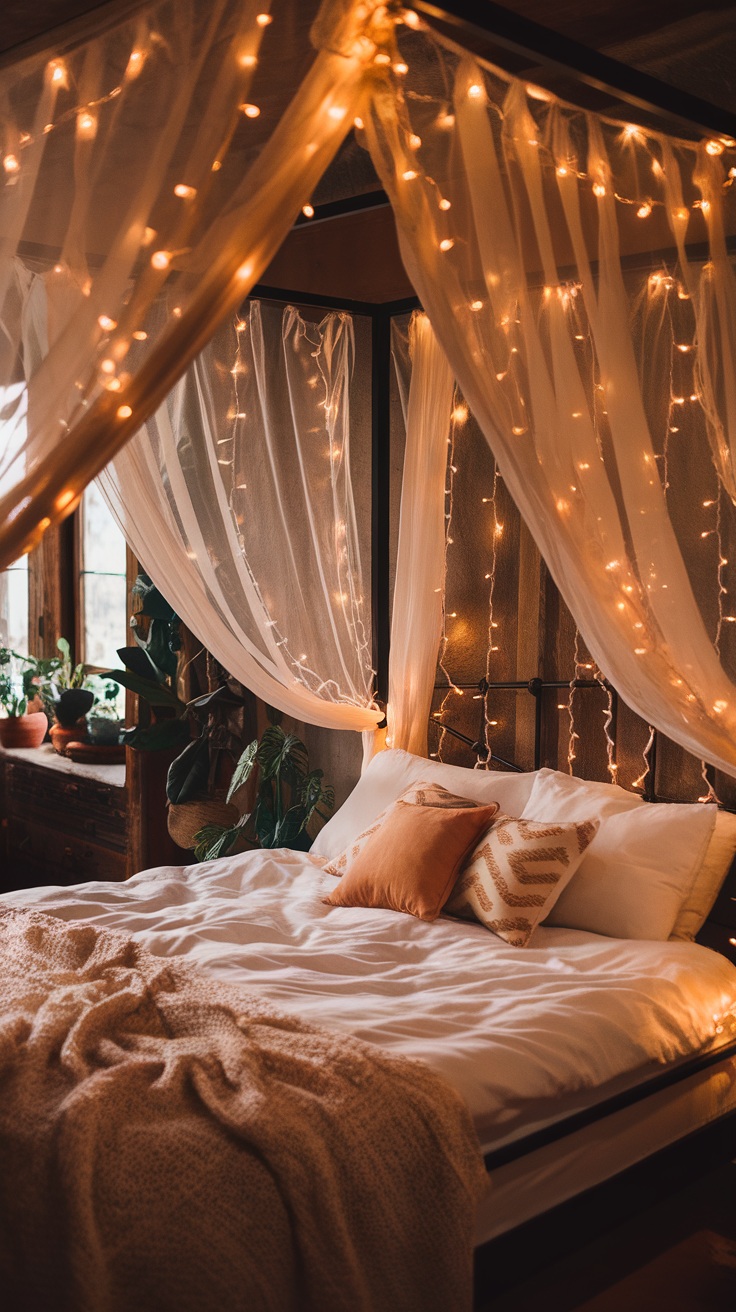
Looking to refresh your home without spending a fortune? DIY wall art ideas are the perfect way to add personality, color, and style to any space. Whether you’re into abstract paintings, modern prints, or textured canvas pieces, there’s no shortage of creative DIY wall art ideas to match your aesthetic.
I remember staring at my blank walls, unsure of how to bring them to life, until I discovered how simple and fun DIY wall art ideas can be. With just a few materials and a little creativity, you can craft unique pieces that make a statement.
From upcycled frames to bold geometric designs, these DIY wall art ideas will completely transform your home. Whether you prefer minimalist designs or vibrant gallery walls, there’s something for every style. Handmade artwork brings warmth and charm that store-bought décor just can’t match.
Plus, creating your own DIY wall art ideas allows you to customize colors, textures, and themes to fit your space perfectly. If your walls feel uninspired, grab some paint, fabric, or wood—because these DIY wall art ideas are about to make your home feel brand new!
Hand-Painted Canvas Art

Hand-painted canvas art can truly bring a personal touch to your space. When I first started creating my own wall art, I found it to be a great way to express my style and creativity. The simplicity of brush strokes and the choice of colors can transform a blank wall into something uniquely yours.
In the image, you can see a canvas with soft, muted pinks against a light background. This kind of design not only feels calming but also adds warmth to any room. I love how it complements different décor styles, from modern to bohemian, making it quite versatile.
When I painted my first canvas, I focused on using colors that resonated with me. Mixing shades to find that perfect hue was part of the fun! If you’re new to this, just start with a few basic colors and don’t be afraid to experiment. The beauty of DIY art is that there are no rules. Just let your creativity flow!
Hanging your artwork in a well-lit area can enhance its impact. I placed mine near a window, and the natural light makes the colors pop. Plus, it’s a conversation starter when friends come over!
Framed Fabric Art

Creating framed fabric art is one of the simplest yet most effective ways to add character to your space. I remember when I first decided to give it a try. I had a beautiful piece of fabric that I simply loved, but I wasn’t sure how to showcase it. Framing it transformed it from a simple cloth into a striking piece of wall art.
The beauty of this style is that you can use almost any fabric. Whether it’s a vintage scarf, a colorful textile, or even a simple linen, each piece tells a story. In the image, the fabric is displayed in a clean, modern frame that highlights its texture. I love how the neutral tones blend seamlessly with the decor, creating a calming focal point.
To get started, all you need is a frame, some fabric, and a bit of time. Simply cut the fabric to fit the frame, ensuring you leave some extra for a neat finish. After that, you can either stretch it over a canvas or place it directly into the frame. I found that adding a mat board can give it a polished look and help the fabric pop.
Framed fabric art can also be a wonderful way to personalize your space. I’ve seen friends use fabric from their travels or family heirlooms, making each piece unique and full of memories. It’s a fun project that allows you to express your style while giving your walls a fresh look.
Pressed Flower Wall Frame

I absolutely love how a pressed flower wall frame can add a touch of nature to any room. It’s like bringing the outdoors inside! The delicate blooms, carefully preserved, create a beautiful focal point that draws the eye.
Creating this piece is such a fun and satisfying project. I remember gathering flowers from my garden and pressing them between the pages of a heavy book. After a week, when I opened the book, I was amazed by how vibrant and uniquely shaped they looked.
Once the flowers were ready, I arranged them in a simple frame. The clear glass allows the colors to shine through, brightening up the wall. I chose a neutral background to let the flowers really pop. Hanging it up made a simple yet striking statement in my living room.
If you want to try this out, all you need are some fresh flowers, a heavy book, and a frame. It’s a wonderful way to preserve memories from special moments, like a wedding or a day spent outdoors.
Minimalist Line Drawing

Minimalist line drawings have a simple charm that can transform any space. I love how a single continuous line can convey so much emotion and meaning. Looking at this piece, I see a face captured in such an elegant way. It reminds me of the beauty in simplicity.
When I first started decorating my home, I wanted artwork that didn’t overwhelm my walls. I found that minimalist art creates a calm and inviting atmosphere. This particular drawing, framed in black, adds a touch of sophistication without being too flashy.
If you’re considering DIY wall art like this, all you need is a canvas, a marker or paint, and some creativity. I often start with a rough sketch before refining it into something more polished. The beauty of minimalist art is that it doesn’t have to be perfect; it just needs to resonate with you.
Bringing a piece like this into your home can spark conversations, too. Friends often ask about the story behind it, and I love sharing how it was inspired by my appreciation for modern art. So, if you’re looking to make a statement with less, consider creating your own minimalist line drawing!
Wooden Wall Panels

Wooden wall panels can really change the vibe of a room. I remember when I first installed them in my living room; it felt like I was stepping into a cozy cabin.
The natural wood grain adds warmth and texture, making a blank wall feel so much more inviting. Just look at those smooth, light-colored panels! They are simple yet elegant, perfectly complementing any decor style.
One of my favorite things about wooden panels is their versatility. You can leave them as is for a clean look or paint them to match your personal style. In my case, I opted for a natural finish, highlighting the wood’s beauty without distraction.
If you’re considering a DIY project, this is a fun option. You just need some wooden boards, a saw, nails, and a little bit of patience. I found it super rewarding to see the transformation once they were up!
Macrame Wall Hanging

Macrame wall hangings have a unique charm that can instantly enhance any room. I remember the first time I made one; it felt like a fun puzzle, tying knots and watching the design come to life. The image here captures a beautiful piece, showcasing intricate patterns and soft fringes that add texture and warmth.
What I love about macrame is its versatility. It can fit in with bohemian, modern, or even rustic decor. This particular hanging, with its creamy white color, complements the neutral tones in my living space, providing a calming contrast against the wall.
Making your own macrame wall hanging can be a rewarding experience. All you need are some macrame cords, a wooden dowel, and a little patience. I found that following online tutorials really helped me grasp the basic knots. It’s amazing how a few simple knots can create something so visually appealing.
Once finished, I hung it in my living room, and it became a focal point. Guests often ask where I got it, and I proudly share that I made it myself. It not only decorates my space but also reminds me of the time and creativity I poured into it.
Diy Photo Collage

Creating a DIY photo collage is one of the easiest and most enjoyable ways to personalize your space. When I first tackled this project, I was amazed at how many memories I could fit onto one wall! Each photo tells a story, and arranging them into a collage lets those stories shine.
In the image, you can see a clean, organized display of various photos, perfectly framed in white. The combination of travel snapshots, candid moments, and scenic views creates a vibrant tapestry of experiences. I love how this setup transforms an ordinary wall into a gallery of cherished memories.
To get started on your own photo collage, gather your favorite pictures—perhaps from vacations, family gatherings, or special events. I usually print mine in a variety of sizes, which adds visual interest. Then, choose a wall that needs some love. It could be in your living room, bedroom, or even a hallway.
When arranging the photos, play around with the layout before committing. I often lay everything out on the floor first to see how it looks. Once I’m happy, I use removable adhesive strips to attach them to the wall. This way, I can easily change things up if I want a fresh look later on!
The result? A unique piece of art that reflects my personality and memories. Every time I walk by, I’m taken back to those moments, and it always brings a smile to my face.
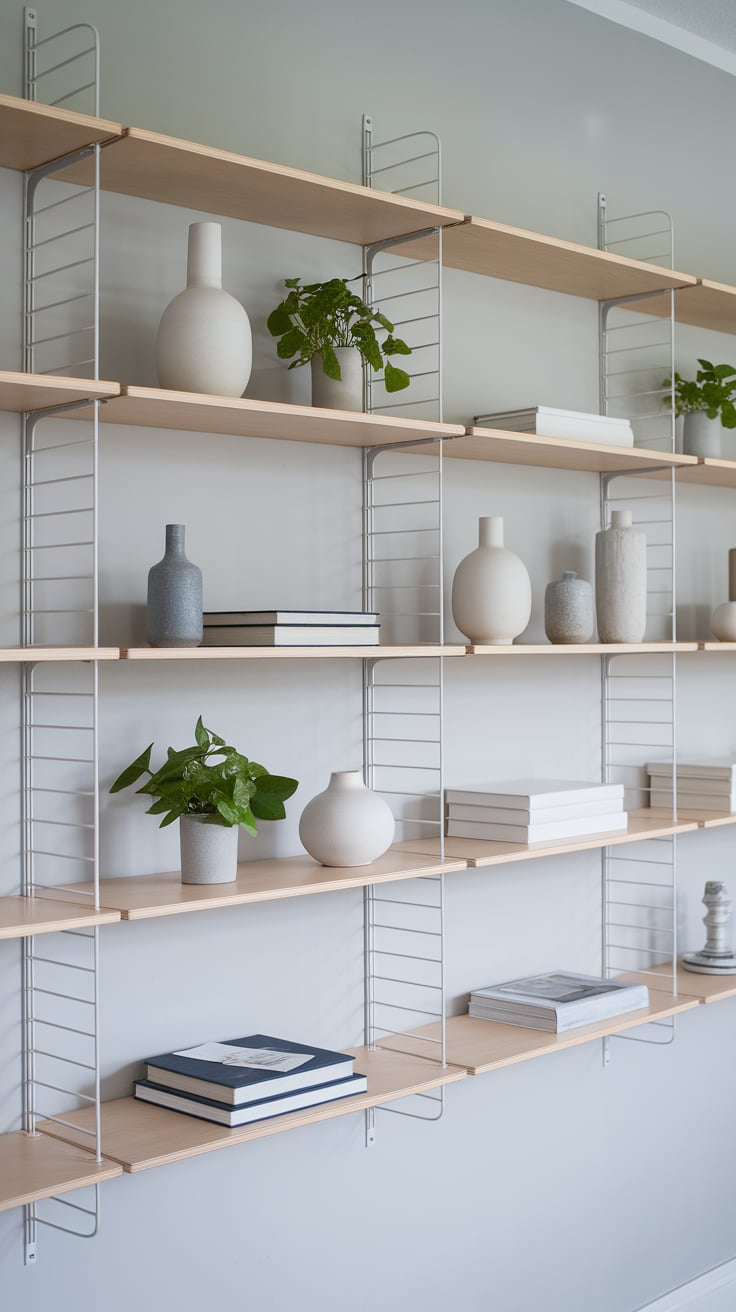
Floating Wooden Shelves With Decor
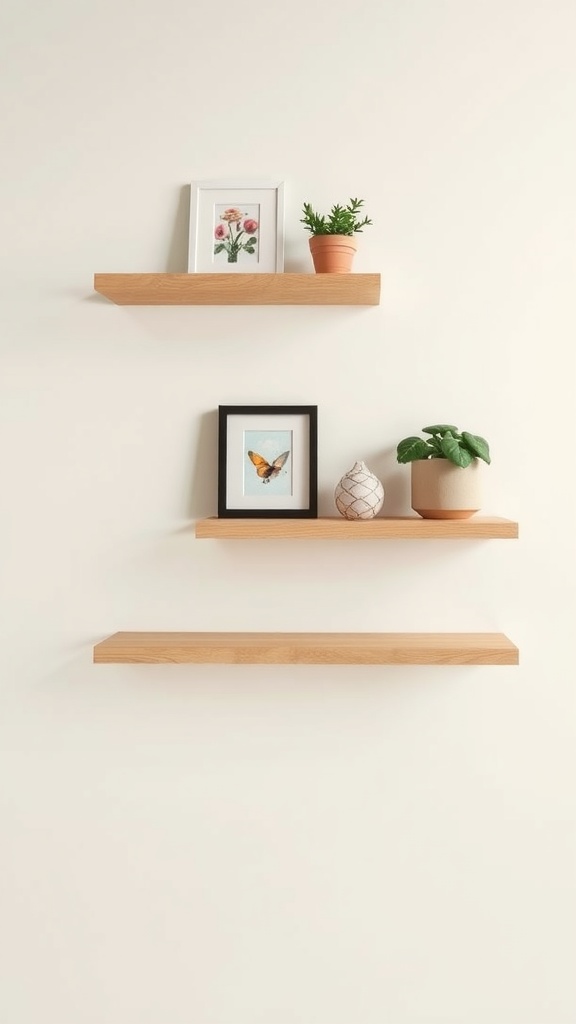
One of my favorite DIY projects has been installing floating wooden shelves. They not only save space but also add a personal touch to any room. In the image, you can see how these shelves are styled with charming decor items.
The top shelf features a small potted plant and a framed picture of flowers. I love using plants because they bring a bit of nature indoors. It’s amazing how a simple green plant can brighten up a space. On the middle shelf, there’s a lovely butterfly print framed in black that really stands out against the soft wall color. This combination of art and greenery creates a cozy feel.
To me, decorating these shelves is a bit like curating a mini-gallery. I often switch out the items depending on the season or my mood. Sometimes, I’ll add holiday decorations, and other times I’ll display travel souvenirs. The possibilities are endless!
When I installed my own floating shelves, I was amazed at how easy it was to do. I simply found some sturdy wooden boards, brackets, and followed a few online tutorials. Once they were up, it felt like my walls had transformed completely.
If you’re considering adding floating shelves to your space, I can’t recommend it enough. They offer a unique way to showcase your personality while also being functional. Plus, styling them can be a fun creative outlet!
Paper Quilling Art

When I first stumbled upon paper quilling, I was instantly drawn to its charm. The vibrant colors and intricate designs are simply delightful. Take a look at this piece that says ‘Flave Love’ surrounded by beautiful flowers and leaves. Each swirl and curl tells a story, making it a unique addition to any wall.
Creating this kind of artwork is not only fun but also therapeutic. I remember spending an afternoon swirling paper strips into lovely shapes while sipping on my favorite tea. The process is calming and allows your creativity to flow freely. You don’t need to be an expert; just a bit of patience and a willingness to experiment will take you far.
This particular design features a bright color palette that instantly lifts the mood of the room. I love how the flowers are layered and how the leaves intertwine, creating a sense of movement and life. It’s like bringing a garden indoors! Hanging this in my living space has sparked countless conversations with friends and family.
If you’re inspired to try your hand at paper quilling, start with some basic supplies: colored paper strips, a slotted tool for rolling, and glue. You can find tutorials online that guide you step by step. Once you get the hang of it, you can customize your designs to fit your style. Whether you want a cheerful greeting or a dreamy landscape, the possibilities are endless!
Framed Vintage Map

There’s something special about a framed vintage map that can instantly elevate your space. I remember when I first decided to add one to my living room. The map I chose is rich in earthy tones, which perfectly complement the dark wall behind it.
Every time I glance at the map, I feel a sense of adventure and nostalgia. It reminds me of all the places I dream of visiting. The intricate details and faded colors take me back to those moments spent exploring antique shops, searching for the perfect piece.
Displaying a vintage map is not just about decoration; it’s about storytelling. Each mark and line can spark conversations about travel and history, inviting guests to share their own experiences. I often find myself pointing out countries I’ve visited or planning future trips while admiring the map.
To make your own framed vintage map, start by selecting a map that resonates with you, whether it’s a world map or a specific region. You can find them at local thrift stores or online. Once you have your map, choose a frame that enhances its vintage charm. Finally, hang it in a spot where it can shine, just like mine does!
Diy Abstract Wall Mural

When I think about transforming a blank wall, I get excited. A DIY abstract wall mural can completely change the vibe of a room. This image showcases a simple, empty space, which might seem dull at first glance but holds endless possibilities.
The key to creating an abstract mural is to let your creativity flow. I remember the first time I painted my own mural. I started with a few colors I loved and let my brush dance across the wall. It was therapeutic and fun! You don’t need to be an artist to make it work.
To kickstart your project, choose a color palette that speaks to you. Grab some painter’s tape to outline shapes or patterns—it’s a foolproof technique that keeps things neat while you paint. Once you have your base shapes down, you can fill them in with colors, patterns, or even splashes of paint for that abstract flair.
After finishing my mural, I stepped back and felt a rush of joy. It turned a stark space into something uniquely mine. Plus, I enjoyed the process so much that I couldn’t wait to tackle my next wall. Trust me, if you’re looking for a way to liven up your space, a DIY abstract wall mural might just be the ticket!
Washi Tape Wall Art

Washi tape wall art is one of those projects that can really brighten up a space, and it’s so simple to create. I’ve had a lot of fun experimenting with different patterns and designs using just this colorful tape. In the image, you can see a striking design made with black washi tape on a clean white wall. The contrast catches the eye and adds a modern touch to the decor.
I love how easy it is to apply washi tape. You don’t need any special tools—just your hands and a pair of scissors. I often start with a rough sketch on paper before transferring it to the wall. It helps to visualize how the design will look. I usually stick with geometric shapes because they give a contemporary feel, just like the design shown here.
One of the best parts? If I ever want to change it up, I can simply peel the tape off and start over. No damage to the wall, and no fuss! I also enjoy choosing different colors based on the season or my mood. Sometimes, I’ll go for bold colors, while other times, I keep it minimalistic with monochrome designs, just like this black tape art.
Washi tape wall art is a creative outlet that lets me express myself in my home. Why not give it a try? Gather some washi tape, find a wall, and let your imagination run wild!
Cork Board Wall Display

Cork boards are such a fun and versatile way to add personality to any space. When I first decided to create a cork board wall display, I was looking for a way to showcase my memories and keep myself organized. The warm, earthy tones of cork give a cozy feel to the room, making it a welcoming spot for creativity and inspiration.
As you can see in the image, the cork board is large, allowing plenty of room for photos, notes, and reminders. I love how it’s not just a practical tool but also a decorative piece. I’ve pinned up snapshots from trips, little doodles from my kids, and even a few inspirational quotes. It truly becomes a reflection of my life.
One of the best things about a cork board wall is its flexibility. You can easily switch out items whenever you feel like it. I often have fun rearranging the layout, which gives my workspace a fresh look. Plus, it’s a great place for me to jot down ideas or tasks. I just grab a pushpin and stick them right up there!
If you’re thinking of creating a cork board wall display, I’d recommend choosing a spot that you frequently look at. It could be above your desk, in a hallway, or even in a cozy nook. Customize it with different colored pushpins or even decorate the edges with washi tape for a personal touch. It’s a simple DIY project that can transform your space into something uniquely yours.
Shadow Box Art

Creating shadow box art is a fun way to add some personality to your walls. I recently made one that features a mix of shells, tiny dolls, and natural elements. It’s a simple yet effective way to showcase memories and interests in a three-dimensional format.
The shadow box I created has a clean white background that makes the items stand out. I placed two cute figurines in playful poses, surrounded by smooth shells and a few dried leaves. There’s even a delicate branch that adds an organic touch. This arrangement reminds me of beach trips, and I love how it brings those warm memories to life.
The text in the shadow box reads, ‘The callors is text.’ It adds an element of whimsy, inviting viewers to engage with the piece. Shadow box art can be customized with any theme or color scheme. You can even incorporate personal mementos, like ticket stubs or small souvenirs, to make it uniquely yours.
For anyone looking to get started, all you need is a deep frame, some creative items, and a little bit of glue. I enjoyed the process so much that I plan to make more for different seasons or occasions!
3D Geometric Wall Panels

One of my favorite DIY projects has been creating 3D geometric wall panels. Just look at this image! It features a stunning arrangement of hexagonal wooden pieces that add texture and depth to any wall.
When I first tried this idea, I was amazed at how simple materials could completely change the look of a room. The different shades of wood and the subtle blue accents create a playful yet sophisticated vibe. I decided to choose a mix of natural wood tones and a few painted pieces, and the result was truly satisfying.
What I love about these panels is that each hexagon can be placed in any pattern you like. You can go for a more orderly design or something a bit more freeform. It gives you the chance to express your creativity in a way that really personalizes your space. Plus, it’s a fun activity to do alone or with friends!
Incorporating 3D geometric wall panels is not just about aesthetics; it’s also about making a statement. Every time I walk by my wall, I can’t help but feel proud of my handiwork. If you’re looking to refresh your space, this might just be the perfect weekend project for you!
Chalkboard Wall

Creating a chalkboard wall in your space can really change the vibe of a room. I love how it adds both functionality and a touch of creativity. Every time I walk by my chalkboard wall, it invites me to jot down thoughts, reminders, or even little doodles.
The beauty of a chalkboard wall is that it’s a blank canvas. You can express yourself however you want. In my experience, I’ve used it to leave little notes for my family or to write down inspirational quotes that brighten my day. Plus, it’s super easy to change things up whenever the mood strikes.
Looking at the image, you can see a fun mix of drawings and text that really brings the wall to life. I’ve noticed that when guests come over, they enjoy adding their own messages or drawings too. It turns the wall into a collaborative art piece!
Additionally, chalkboard walls work in so many spaces. Whether it’s in a kitchen, home office, or even a kid’s playroom, it adds a playful touch. If you’re considering one, I recommend using chalkboard paint. It’s easy to apply and creates a smooth surface for writing.
In conclusion, a chalkboard wall is more than just decoration; it’s a way to engage with your space and express your personality. So grab some chalk and let your creativity flow!
Embroidery Hoop Art

Embroidery hoop art is a fun and creative way to add a personal touch to your walls. In the image, you can see a delightful mix of floral designs and playful phrases, all elegantly displayed in wooden hoops. It’s a charming way to showcase both my needlework skills and my sense of humor.
When I first started with embroidery, I was amazed at how versatile it could be. These hoops can transform any small space or empty wall into a cozy gallery. The combination of colors and textures adds depth to the room, making it feel more inviting.
The process is quite relaxing too. I usually pick a few favorite quotes or flower patterns, then spend an afternoon stitching away. It’s both a creative outlet and a personal project that reflects my style. Plus, it’s a great conversation starter when friends come over!
The best part? You can customize your embroidery hoop art to match your decor. Whether you prefer bold colors or soft pastels, the choices are endless. I love mixing different sizes and styles for an eclectic look that feels uniquely mine.
Diy Floating Canvas Art

When I first tackled the idea of floating canvas art, I was amazed at how simple it was to create something that added a lot of character to my space. This particular piece features some intriguing text, which adds an element of curiosity and depth to the room.
The floating effect makes the artwork appear as if it’s gently hovering on the wall, which is a look that I find really draws the eye. What I love about this approach is that it can easily fit into any decor style—whether your taste is modern, rustic, or somewhere in between.
Creating your own floating canvas art can be a fun weekend project. You can get creative with colors, quotes, or even images that speak to you. I remember going through different design ideas and finally settling on something that reflects my personality and mood. It felt rewarding to hang it on the wall and see how it transformed the space.
So, if you’re looking for an easy DIY project that can make a significant impact in your home, give floating canvas art a try. You might just surprise yourself with what you can create!
Metal Wire Grid Display

One of my favorite DIY projects is creating a metal wire grid display. It’s a simple way to showcase memories and inspiration. When I first set it up, I felt an instant change in the room. The grid itself is just a metal frame with a grid pattern, and it can be painted to match your decor. You can find these at most craft or home stores, or even online.
What I love most is how versatile it is. I can easily clip on photos, quotes, or reminders using colorful binder clips or clothespins. This makes it easy to swap things out whenever I feel like refreshing the look. Each time I walk by, I’m reminded of fun moments or my goals for the year.
To make your own, start by hanging the grid on a wall in a spot that catches your eye. Gather your favorite photos, notes, or art pieces, and choose clips that add a pop of color. I often mix in some personal touch, like polaroids from trips or little notes my friends have written me over the years.
This display not only serves as art but also as a functional board for important reminders. It’s a beautiful blend of creativity and organization in one spot!
Diy Wooden Sign With Quote

Creating a DIY wooden sign with a quote is a fun and personal way to add character to any space. In the image, you can see a beautifully crafted wooden sign that features a quote on planks of light-colored wood. The natural grain of the wood adds warmth, making it a perfect fit for any room. I love how the design can be customized with various quotes, allowing you to express your thoughts or favorite sayings.
When I made my own wooden sign, I chose a quote that inspires me daily. I went to a local craft store to pick up some wooden planks, paint, and a stencil for the lettering. The best part was picking the quote. It felt like a personal touch to my décor. Once I painted the letters, I hung it in my living room where it catches the eye of every guest.
Using stencils helps to keep the letters neat and legible, just like in the image. You can experiment with different sizes and fonts until you find the perfect match for your style. This project not only enhances your wall but also brings a sense of fulfillment as you look at something made by your own hands.
Mosaic Tile Art

Mosaic tile art is such a fun and expressive way to add a personal touch to your wall. In the image, I see a vibrant piece made with various colored tiles, creating a beautiful pattern. The colors blend together nicely, bringing warmth and character to the space.
What I love about this type of art is that it can be customized to fit any theme or style you want. You can choose colors that match your existing decor, or go bold with contrasting shades. The piece in the picture even features letters, making it feel unique and personal.
When I created my own mosaic, I enjoyed the process of picking out each tile. It was a relaxing activity, and seeing it come together was so satisfying. I found that using a simple frame really helps to finish off the artwork and gives it a polished look.
If you’re considering diving into mosaic art, gather some tiles, a sturdy base, and your adhesive. Start by sketching out your design lightly. Then, one by one, place the tiles according to your plan. It’s a great way to spend an afternoon, and the end result can truly transform your wall!