
If you’re anything like me, you’ve got an old mirror stashed in a closet or hanging on the wall that could use a little love. That’s exactly why I pulled together these DIY mirror makeover ideas—because sometimes, all it takes is a bit of creativity to transform something plain into a true statement piece.
Whether you love rustic charm, modern minimalism, or boho vibes, these DIY mirror makeover ideas will inspire you to grab your glue gun and get crafty. I started my first mirror project with leftover trim and some gold spray paint—and just like that, I was hooked on DIY mirror makeover ideas!
These DIY mirror makeover ideas are perfect for upcycling, refreshing thrift finds, or giving your space a totally new look without spending a ton. From paint and rope to mosaic tiles and decoupage, there’s no shortage of creativity in these DIY mirror makeover ideas.
You’ll find quick weekend projects and more detailed upgrades, all focused on making your mirrors pop. Trust me, once you try one of these DIY mirror makeover ideas, you’ll start seeing every mirror as a blank canvas.
Boho Rope Mirror

When I first stumbled upon the idea of a boho rope mirror, I knew I had to give it a go. There’s something so earthy and inviting about using natural materials to create home decor. This mirror, wrapped in jute rope, adds a relaxed vibe to any room. It’s simple yet stylish, and honestly, it became a conversation starter in my living space.
To make one, I started with a basic round mirror. I just wrapped the rope around the edges, securing it with a hot glue gun. It took a bit of patience, but seeing the finished product hanging on my wall made all the effort worth it. Plus, I felt like I’d achieved something special with my own hands!
The mirror also pairs beautifully with other decor elements, like the dried plants I have nearby. Together, they create that cozy bohemian feel that I love. If you’re looking for a DIY project that’s both fun and rewarding, this rope mirror is a fantastic choice!
Vintage Gold Leaf Frame

The vintage gold leaf frame is a real showstopper in any room. I love how it adds a touch of elegance without being too flashy. The intricate details of the frame create a charming vibe, making it perfect for homes that want a classic look.
When I first saw a mirror like this, I couldn’t help but imagine how it would elevate my space. The golden hues catch the light in such a warm way, making my living area feel cozy and inviting. I even tried to find a similar one for my home, and I was amazed at how much difference it made!
This style of mirror pairs beautifully with dark walls, like the deep green behind it. It creates a stunning contrast that draws the eye right to it. Plus, the way it reflects light can make the room feel bigger and brighter.
To really make this mirror pop, I like to style the space around it. For instance, placing candles or decorative items on the table beneath it brings everything together. I’ve found that it becomes a perfect spot for friends to gather and admire the decor!
Rustic Wood Slice Mirror
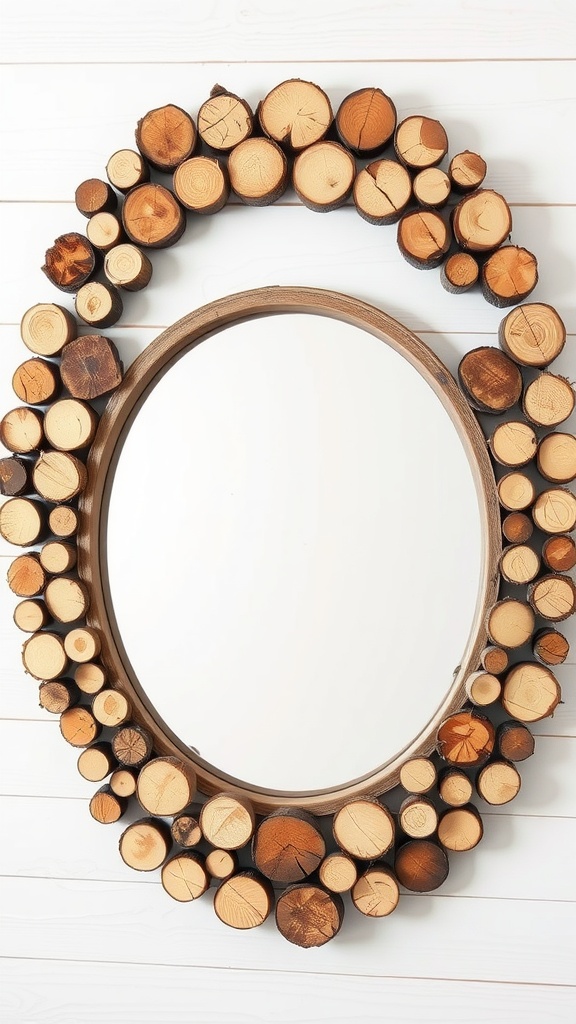
I absolutely love the charm of this rustic wood slice mirror! It’s like bringing a piece of nature right into your home. The round mirror is surrounded by different sizes of wood slices, creating such a warm and inviting vibe. I remember when I first saw something similar at a friend’s place, I just had to try making one myself.
To create a rustic wood slice mirror, I gathered some wood slices, a round mirror, and a sturdy base. I spent an afternoon arranging the wood slices around the mirror, mixing and matching sizes and colors for an organic look. You can use hot glue to secure them in place. Trust me, it’s easier than it sounds!
Once it was done, I hung it up in my entryway. Every time I walk by, I can’t help but smile at how it brightens up the space. It’s not just a mirror; it’s a conversation starter too! If you’re looking to add a touch of rustic decor to your home, this DIY project is definitely worth trying out.
Modern Black Grid Mirror

When I first laid eyes on a modern black grid mirror, I knew I had to give my space a little upgrade. This design really stands out with its clean lines and contemporary vibe. It kind of reminds me of those stylish windows you see in chic urban lofts.
The black grid creates a striking contrast against a lighter wall, making it a real focal point in any room. I love how it adds depth without being too flashy. Plus, it’s super versatile! I’ve seen it used in everything from bathrooms to living rooms, and it fits right in.
One thing I really appreciate is how easy it is to make one yourself or even spruce up an old mirror. You don’t need to be an expert DIY-er. Just grab some paint and a few supplies, and you’re good to go! Trust me, the result is worth the effort.
Beachy Seashell Mirror

This beachy seashell mirror is such a fun project that adds a touch of coastal charm to any room. I remember when I first decided to give my old mirror a makeover. I had seashells collected from various trips to the beach, and I thought they’d be perfect for this.
The mirror itself has a simple shape, which allows the seashells to really stand out. I love how the different textures and colors of the shells create an inviting frame. It makes me feel like I’m always near the ocean, even when I’m indoors.
To create your own, all you need is a mirror, some seashells, and a strong adhesive. You can start by arranging the shells around the frame without glue to see how they fit together. Once you’re happy with the layout, just glue them down. I found that mixing in a few starfish really adds to the beachy vibe!
This mirror not only reflects my image but also brings back memories of sunny days by the sea. It’s a reminder of the simple joys of life. Plus, it’s a great conversation starter when guests come over. There’s just something so refreshing about having a piece of the beach in your home.
Colorful Mosaic Tile Mirror

When I first saw this colorful mosaic tile mirror, I couldn’t help but feel inspired. The vibrant greens, blues, and pops of orange create such a lively atmosphere. It’s like bringing a piece of the ocean right into your home.
Making a mirror like this could be a fun weekend project. I remember the first time I tried my hand at a mosaic. I gathered some old tiles and had a blast breaking them into smaller pieces. The process of arranging them into a design was both relaxing and exciting. Plus, it’s a great way to repurpose materials you might have lying around.
The mirror’s frame adds a unique touch to any space, whether it’s in a bathroom or a hallway. I love how it can complement different decors, from modern to bohemian. Just imagine how many compliments you would get from guests!
If you decide to make your own, don’t be afraid to experiment with colors and patterns. You can personalize it in a way that truly reflects your style. And trust me, watching it come together piece by piece is super rewarding.
Macramé Fringe Mirror

The Macramé Fringe Mirror is such a fun twist on traditional mirrors! I love how the texture of the macramé adds a cozy feel to any room. When I first made one, I didn’t realize how much it would brighten up the space.
It’s basically a round mirror surrounded by beautiful knotted fringe made from cotton rope. The fringe dangles down in a playful way, and it can really become a focal point in your home. I hung mine above a little plant, and it just ties the whole corner together.
To make it, all you need is a mirror, some macramé cord, and your favorite colors of rope. I started with basic knots and worked my way up. Trust me, it’s easier than it looks! Plus, there are tons of tutorials online if you need help. It’s a perfect weekend project!
Once I finished mine, I couldn’t stop admiring it. Every time I walk past, I get a little smile. It’s funny how such a simple project can bring so much joy and personality into a room. I even paired it with some other wall hangings to create a little gallery wall.
Chalk Painted Vintage Frame

<p;i a=”” across=”” beautiful,=”” chalk=”” come=”” completely=”” design=”” diy=”” embarked=”” felt=”” for=”” frame=”” fun=”” had=”” have=”” how=”” intricate=”” it=”” itself=”” just=”” know=”” like=”” little=”” love.=”” me.<=”” mirror=”” moments=”” needed=”” of=”” on=”” one=”” p=”” paint.=”” pieces=”” potential?=”” project=”” recently=”” sometimes=”” that=”” the=”” this=”” those=”” transformed=”” using=”” vintage=”” was=”” you=””><p;i a=”” about=”” after=”” afterward.<=”” and=”” any=”” brush=”” chalk=”” chose=”” clean,=”” cool=”” distressed=”” don’t=”” easy=”” fancy=”” for=”” give=”” giving=”” good=”” how=”” i=”” is=”” it=”” just=”” look=”” maybe=”” need=”” p=”” paint=”” painting.=”” rustic,=”” sandpaper=”” soft=”” some=”” started=”” that=”” the=”” thing=”” to=”” tools,=”” vibe.=”” vintage=”” white=”” with.=”” work=”” you=””><p;as a=”” absolutely=”” added=”” already=”” bit=”” brighten=”” charming=”” could=”” dried,=”” edges=”” furniture=”” giving=”” how=”” i=”” it=”” it’s=”” lightly=”” like=”” living=”” love.=”” my=”” new=”” of=”” once=”” original=”” p=”” paint=”” painted,=”” personality!<=”” picture=”” piece=”” reveal=”” sanded=”” space.=”” that=”” the=”” to=”” touch=”” underneath.=”” up=”” wood=”” would=””><p;in a=”” about=”” an=”” and=”” anymore;=”” at=”” be=”” can=”” chalk=”” conversation=”” definitely=”” difference=”” diy=”” end,=”” frame.=”” home.=”” hung=”” i=”” if=”” in=”” into=”” it=”” it’s=”” just=”” light.=”” make!<=”” mirror=”” much=”” my=”” not=”” old=”” on=”” opposite=”” out=”” p=”” paint=”” piece=”” project,=”” recommend=”” reflects=”” so=”” starter!=”” statement=”” surprised=”” the=”” thinking=”” trying=”” turned=”” wall=”” window,=”” you’re=”” you’ll=””></p;in></p;as></p;i></p;i>
Industrial Pipe Mirror
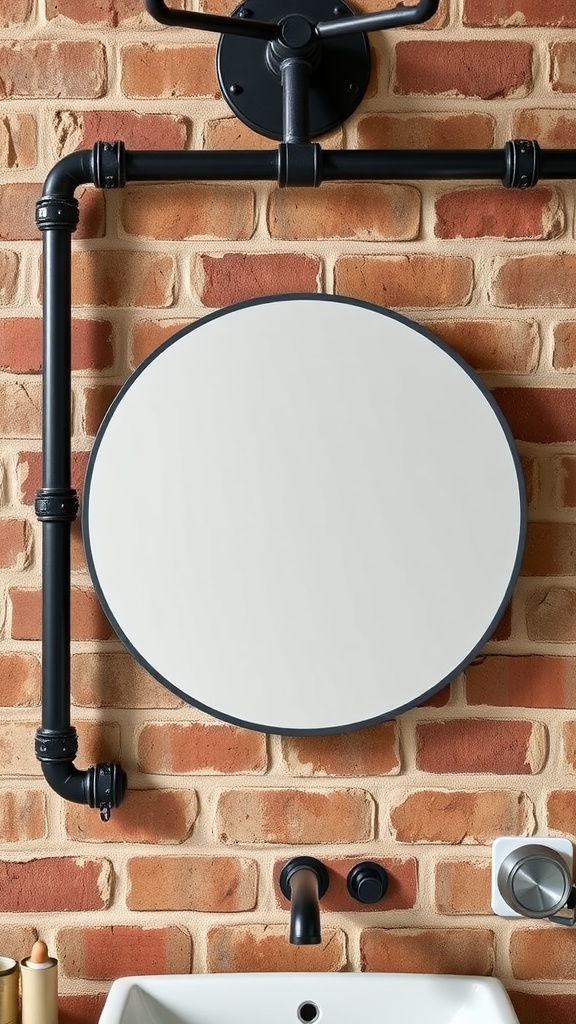
When I first saw the industrial pipe mirror, I was instantly drawn to its unique blend of functionality and style. The round mirror, framed with black pipes, adds a touch of urban flair to any space. The contrast of the sleek mirror surface against the rugged brick wall creates a striking visual. I can imagine it being the centerpiece in a modern bathroom or even a cozy entryway. It really stands out, and I think it could inspire a lot of DIY enthusiasts like myself to tackle a similar project.
Creating an industrial pipe mirror is a fun weekend project. All you need are a few pipes, some fittings, and a round mirror. I remember my first attempt; it was a bit challenging but so worth it. Start by measuring your wall space and determining how you want the mirror to hang. Then, simply cut the pipes to your desired length, and assemble them into a frame. Once everything is in place, attach the mirror securely. You can customize the finish of the pipes too, which adds your personal touch. I love how versatile this design is; it can fit into various decor styles from rustic to modern. It’s a nice way to add character to your home without spending a ton of money.
Flower Petal Spoon Mirror

The Flower Petal Spoon Mirror is such a fun project! When I first saw it, I thought, ‘Why not make something unique and colorful for my wall?’ It combines simple materials into a bright, cheerful design that catches the eye.
To create this mirror, I used plastic spoons, spray paint, and a basic round mirror. The spoons are painted pink, adding a playful touch that instantly lifts the mood of any room. I remember spending a weekend just painting and arranging the spoons around the mirror. It was so enjoyable!
Once I finished, I hung it up in my living room. Every time I walk by, it makes me smile. This DIY project is not just about decor; it’s about adding a personal touch to your space. Plus, it’s a conversation starter when guests come over!
If you’re looking for a way to brighten your home without spending too much, this Flower Petal Spoon Mirror is a fun and easy option. You can even customize the color to match your home’s theme. Just let your creativity flow!
Barnwood Plank Mirror

Creating this mirror was a fun experience. I remember rummaging through some old wood pieces in my garage. I found planks with different shades that gave it that farmhouse vibe. Making the frame was easier than I thought. Just a few cuts, some sanding, and a little bit of wood glue to hold it all together. After a quick coat of finish, I was ready to attach the mirror.
Now, this mirror hangs proudly in my living room, and every time I look at it, I feel a sense of accomplishment. It’s not just a mirror; it’s a piece of art that carries a story. Plus, it makes a great conversation starter when guests visit. If you’re looking to add some rustic charm to your home, I highly recommend giving the barnwood plank mirror a try!
Painted Geometric Frame

I recently decided to give an old mirror a new life with a fun painted geometric frame. The mirror itself was pretty plain, but I knew that with a little creativity, it could become a great focal point in my room.
First off, I gathered some colorful paints that I had lying around. It was a mix of reds, blues, yellows, and browns. I really wanted to play with shapes, so I sketched out a few geometric patterns on paper before I started painting. It helped to visualize what I wanted the final look to be.
Once I felt confident, I taped off sections of the frame and got to work. The process was super relaxing! I loved seeing each section come to life with color. The pops of color against the simple mirror made it feel so much more vibrant. I didn’t bother to be too perfect; the imperfections just added character.
After everything dried, I hung it up in my room and couldn’t believe how different it looked. It’s like the mirror had its own personality now! If anyone’s thinking about a DIY project, this one is really fun and adds a personal touch to your space.
Mirrored Tray Wall Art
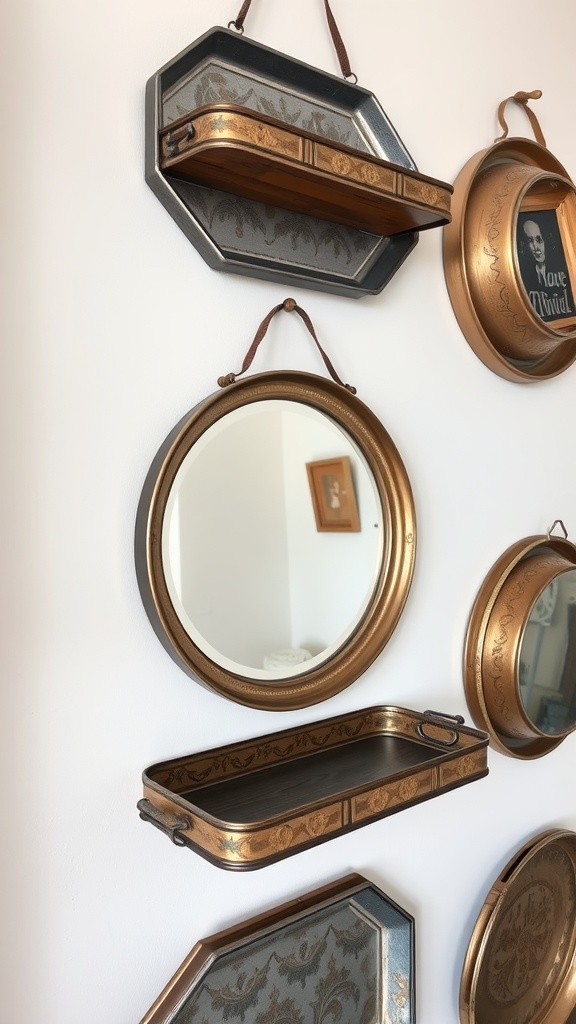
When I first tried my hand at DIY projects, I never thought something as simple as a mirrored tray could transform a wall. The image above shows a beautiful arrangement of mirrors and trays, and I can’t help but admire how they all come together. Each piece adds its own flair, creating a unique gallery that really catches the eye.
I love the mix of shapes and finishes in this display. The round mirror pops against the gold and metallic tones of the trays, making it a visually appealing setup. I remember when I decided to reorganize my own wall; it was a fun process! I played around with different heights and arrangements until I found something I really liked.
One trick I learned is to incorporate different sizes of trays and mirrors. It adds depth and interest to the design. If you have old trays lying around, think about painting them or adding some decorative elements. I once used some leftover fabric to line the bottom of a tray, giving it a fresh look!
Creating this kind of wall art is not just about aesthetics; it’s about expressing your personal style. Each tray and mirror can tell a story or hold a special memory. So don’t be afraid to mix and match! I find that the more personal touches I add, the more I love the end result.
Faux Sunburst Mirror

The faux sunburst mirror is such a fun and stylish addition to any wall. I remember when I first came across this design; it instantly caught my eye! The way the rays extend outwards gives it a playful vibe that can brighten up a room.
This particular mirror features a circular center surrounded by elongated pieces that mimic sun rays. It’s made from simple materials, like wood or lightweight plastic, which makes it super easy to create at home. I tried making one for my living room, and it was a blast!
To get started, all you need is a round mirror, some wooden dowels or sticks, and a bit of paint. You can paint the sticks any color that suits your decor. I went with a natural wood finish, which really pops against my blue wall. It looks like a piece of art rather than just a mirror. Plus, the best part? It’s quite budget-friendly!
When I hung it up, I felt like I’d transformed the entire space. It’s surprising how a single piece can elevate a room’s aesthetic. If you’re looking for something unique and creative, this faux sunburst mirror might just be the project for you!
Driftwood Stick Mirror

I’ve always loved the beach and the natural vibe that driftwood brings. So, when I decided to create a mirror using driftwood sticks, it was such a fun project! It adds a rustic charm to any room, making it feel like a little piece of nature is inside your home.
Choosing the right sticks is key! I went to the beach and collected various pieces. After cleaning them, I arranged them around an old mirror I had lying around. I think it turned out pretty well! The different shapes and sizes of the sticks give it a unique character.
While working on this mirror, I found it relaxing to just focus on the materials. I used a hot glue gun to attach the sticks, which was super easy. Plus, it’s a great way to spend a weekend afternoon. I hung it up in my living room, and it instantly became a conversation starter when friends come over.
If you’re looking for a DIY project that’s simple yet rewarding, I totally recommend trying a driftwood stick mirror. It’s a great way to bring the beach into your home without a lot of fuss!
Fabric-Wrapped Mirror Frame

One of my favorite DIY projects has to be the fabric-wrapped mirror frame. It’s such a simple way to add a pop of color and texture to any space. Plus, it’s a fun way to use up leftover fabric that I just couldn’t part with.
In the image, you can see a mirror framed in a beautiful floral fabric. This adds a cozy, personal touch to any room. I remember when I first tried this out; I was amazed at how easy it was. All you need is some fabric, a mirror, and a bit of glue.
To get started, I measured the mirror and cut the fabric accordingly, leaving some extra for folding and wrapping. I used a fabric that really matched the vibe I was going for in my room. After that, I glued the fabric to the frame, tucking and folding it in a way that looked neat and intentional.
What I love most is how each fabric can transform the mirror’s look. You can go for something bright and bold, or a soft pastel to keep it understated. It’s honestly like giving the mirror a whole new personality!
Don’t forget to let the glue dry completely before hanging it up. I’ve rushed this step before, and it didn’t end well! Once it’s all set, hang it on the wall, and you’ll have a unique piece that feels like you.
Minimalist Wooden Ring Mirror

The minimalist wooden ring mirror is a charming addition to any space. I love how it combines simplicity with natural elements. The smooth wood finish gives it a warm and inviting feel. Plus, the round shape is just so pleasing to the eye.
Every time I look at it, I’m reminded of how much I appreciate clean lines and understated design. It’s perfect for small areas or even as a statement piece in a larger room. I’ve found it fits nicely over my entryway console, making the space feel more open and airy.
Hanging it with a simple strap adds a touch of character, too. When I first hung mine, I was amazed at how easy it was to elevate the room’s vibe. It feels like a little slice of nature, right there on my wall!
Rattan Wrapped Mirror

When I first saw a rattan wrapped mirror, I was instantly drawn to its natural charm. The warm tones of the rattan create a cozy vibe that can fit into any room. It’s like bringing a piece of the outdoors inside, and I love how it adds texture to the space.
What’s really neat about a rattan wrapped mirror is how versatile it is. I’ve tried placing it in different spots in my home, and it always seems to elevate the decor. Whether it’s above a dresser or hanging on a wall surrounded by plants, it just works.
One of my favorite memories is when I hosted a small gathering at my place. Everyone kept stopping to admire the rattan mirror! It sparked conversations about DIY projects and home decor. It’s fun to see how something so simple can make such an impact.
If you’re thinking of giving your mirror a makeover, rattan wrapping could be the way to go. It’s not super complicated, and you can customize it to match your own style. I’ve even seen people paint the rattan in different colors for a bold statement!
Paint-Dipped Frame Mirror

The paint-dipped frame mirror is just a simple way to add a pop of color and style to your space. I’ve tried this look in my home, and it really does brighten up a room. The mirror has a clean, modern design, and the bottom section is painted in a soft pink, which creates a lovely contrast with the natural wood frame.
To make one, all you need is a plain mirror, some painter’s tape, and your choice of paint. First, I taped off the area where I wanted to apply the paint, making sure to get those edges just right. Then, I used a soft brush to apply the paint. I recommend doing a couple of coats for even color.
What’s nice about this project is that you can choose any color that matches your decor! I went with pink, but I think a bold blue or green would look great, too. After letting it dry, I carefully removed the tape and was so happy with how it turned out. It really added a personal touch to my hallway!
If you’re looking for a fun and easy DIY, this paint-dipped frame mirror project is a great way to start. It’s a good way to express your creativity while also making something practical for your home.
Crackle-Effect Painted Mirror

To get started, you’ll need a mirror, acrylic paint in two contrasting colors, and a crackle medium. First, I painted the entire frame with the base color and let it dry completely. Then, I applied the crackle medium. This part is super fun because it starts to create those lovely cracks as it dries. Finally, I brushed on the top color, which reveals the base beneath. Watching it crackle made me feel like a kid again.
One tip I learned is to not rush the drying process. I tried to speed it up once, and the cracks didn’t turn out as nice. Also, placing it in an area with good lighting really shows off the details. I ended up hanging mine in my living room, and it’s become a little talking point among friends!
Washi Tape Border Mirror
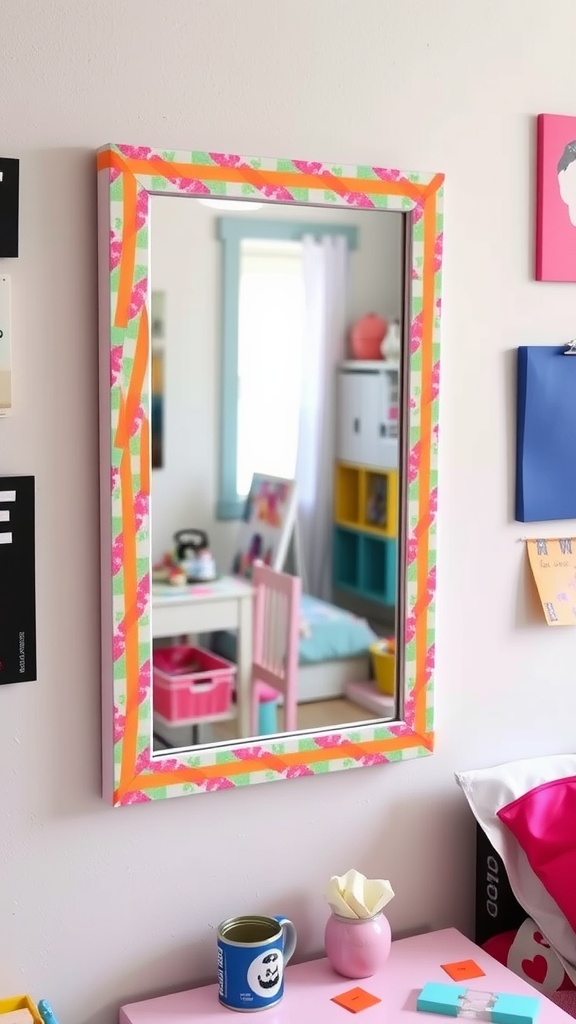
I recently decided to give my plain mirror a little pizzazz, and I chose a washi tape border to do it! It was super easy and required just a few simple steps. Plus, it’s a fun way to add some color to any space.
The image shows a mirror with a bright and playful border made from washi tape. I used a mix of vibrant colors and patterns that really brought the mirror to life. The best part is that washi tape is removable, so if you wanna change things up later, it’s no biggie.
To start, I gathered my materials. All I needed was a mirror, some washi tape in various colors, and a pair of scissors. The first step was to clean the edges of the mirror thoroughly to make sure the tape sticks well. Then, I simply measured and cut the tape to the right lengths and started applying it around the edges.
One tip I’d give is to overlap the tape slightly at the corners. It keeps everything looking neat and cohesive. I really enjoyed the process and got lost in picking which colors to use. Once I finished, it felt like I had a brand new piece of decor that brightened up my room.
If you’re looking for a quick and budget-friendly DIY project, this washi tape border mirror is totally something I recommend. It’s fun, easy, and really lets you express your personality!