
Turning your outdoor space into a cozy retreat doesn’t have to drain your wallet. These budget-friendly patio makeover tips helped me completely refresh my small patio last summer—without spending more than a weekend and a few hundred bucks.
From thrifting smart décor to repurposing what I already owned, these budget-friendly patio makeover tips proved that style doesn’t need a high price tag. Whether your patio is big or tiny, these patio makeover ideas on a budget can make it feel like a brand-new space.
If you’re dreaming of a fresh outdoor look, these budget-friendly patio makeover tips are packed with smart, affordable tricks. I mixed DIY projects, clever layout changes, and easy updates to create an inviting hangout spot.
These budget patio makeover tips work even if you’re renting or short on time. Ready to turn that tired patio into your new favorite chill zone? These budget-friendly patio makeover tips have got you covered.
Add String Lights For Ambiance

When it comes to giving your patio a cozy feel, string lights are where it’s at! I remember the first time I draped some around my backyard; it instantly transformed the space. The glow of those bulbs created a warm atmosphere that made my patio feel like a little escape.
Just look at the image! The soft light hanging above the seating area makes it look inviting. I love how the trees in the background are silhouetted against the sky, adding to the charm. Plus, they’re super budget-friendly. You don’t need to break the bank to create a lovely vibe.
Hanging them is simple, too. You can string them along a fence, wrap them around trees, or hang them from the eaves of your house. I used small hooks to secure mine, and it was an easy afternoon project. The best part? Sitting outside at night, surrounded by friends and family, with those twinkling lights above makes any evening feel special.
Use Outdoor Rugs To Define Space

When I was sprucing up my patio, I quickly learned that outdoor rugs can really make a difference. They help to define a space, giving it a cozy and inviting feel. I remember when I added a large rug to my own patio, it felt like an instant upgrade! It was like creating a mini-room outside.
The image shows a lovely patio setup with a beautiful rug anchoring the seating area. The way it brings together the black furniture and potted plants really enhances the entire look. I love how the colors in the rug complement the greenery around it. It’s all about layering different textures and patterns, and an outdoor rug is a key piece.
When choosing a rug for your patio, think about materials that can withstand the weather. I found that rugs made from synthetic fibers are durable and easy to clean, which is a big plus. Plus, there’s a ton of designs out there, so you can easily find one that fits your style. I went for a patterned rug because I think it adds a bit of personality to the space.
Another tip is to ensure that the size of the rug fits your seating area. A rug that’s too small can make the area feel disconnected. I learned this the hard way! In the end, a well-placed outdoor rug not only defines the space but also makes it feel more cohesive and welcoming.
Paint Old Furniture

One of the easiest ways to refresh your patio is by painting old furniture. I recently dug out some of my neglected outdoor chairs and gave them a new look. It’s like breathing new life into them! I chose a light blue color that really brightens up the space.
Before starting, I cleaned the chairs thoroughly to remove any dirt or peeling paint. It’s super important to prep the surface, otherwise, the paint won’t stick well. I just used a simple outdoor paint that’s designed for wood, and it worked really well for me.
The process was surprisingly relaxing. I set up my supplies on a sunny afternoon and just took my time. I love seeing the transformation from drab to fab right before my eyes. Plus, it’s such an affordable way to upgrade your patio without breaking the bank.
Once I finished painting, I let the chairs dry completely. The sunlight made it quick, and I was so excited to finally place them back on the patio. It’s nice to know that a little bit of paint can make all the difference!
Create A DIY Pallet Sofa
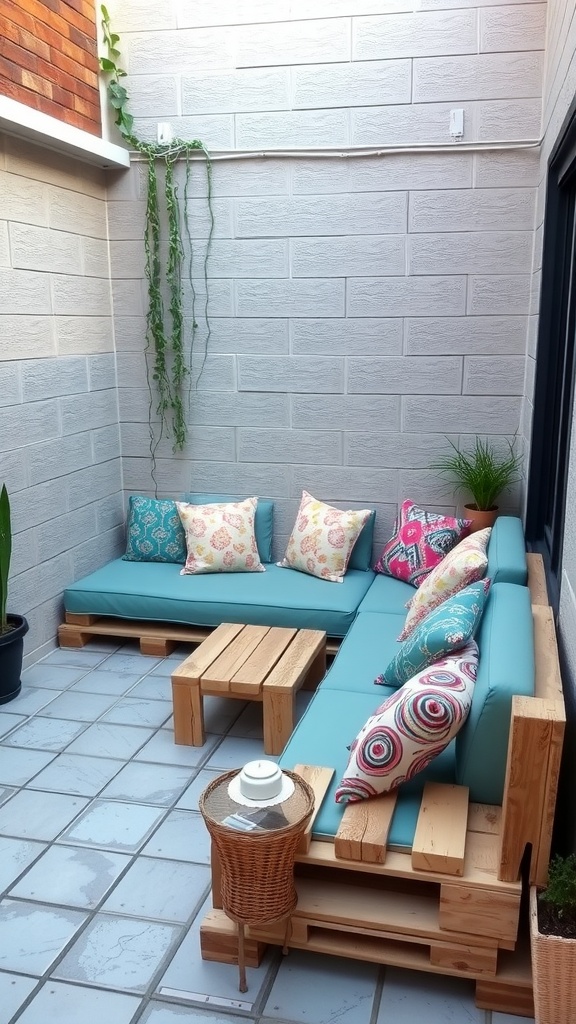
When I wanted to give my patio a little facelift, creating a DIY pallet sofa was one of the first ideas that came to mind. It’s not only budget-friendly but also super satisfying to build! I remember my first time working with pallets; it felt like playing with giant building blocks. The overall look really transformed my space.
In the image, you can spot a cozy sofa made from wooden pallets. It’s topped with soft cushions that make it inviting. The pops of color from the pillows add a fun touch, which is a simple way to personalize the design. I love how the sofa wraps around the corner, creating a snug area to lounge with friends or just to sip coffee on a sunny day.
To make your own, start by finding some sturdy pallets at local stores or online. Once you’ve got them, you can sand them down for a smooth finish. Then, stack and secure them together in your desired shape. I used some outdoor cushions for comfort and a few colorful pillows for flair. It really makes a difference! A small side table or two can complete the setup, just like in the picture. I found mine at a thrift store, which was a great way to save even more cash.
Now, every time I sit on my DIY pallet sofa, it reminds me of the fun I had putting it together. Plus, it’s always a topic of conversation when I have guests over!
Hang Curtains For Privacy
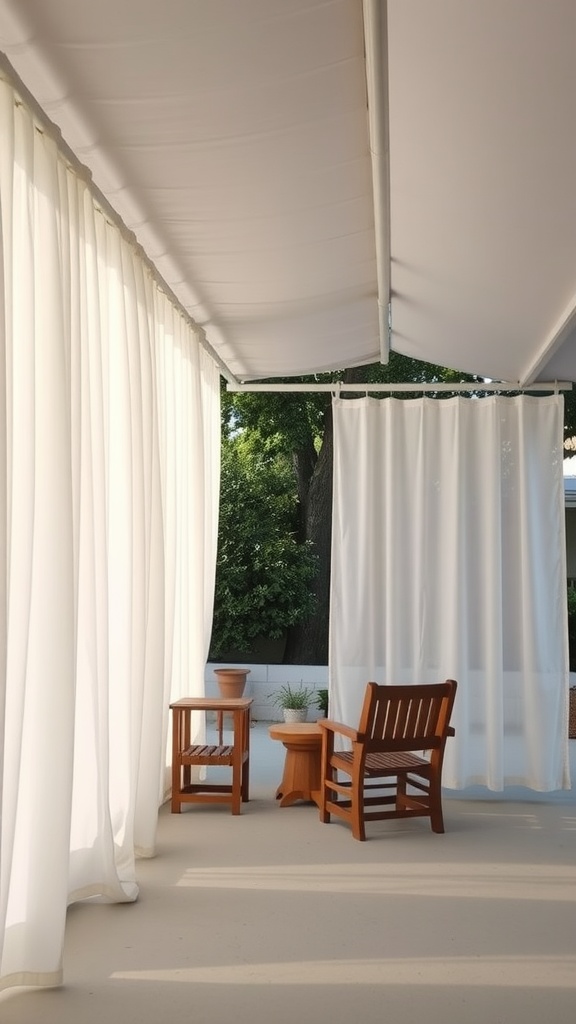
One of the easiest ways to add privacy to your patio is by hanging curtains. I remember when I first did this in my own outdoor space, it felt like an instant upgrade. The sheer white curtains in this image not only provide a cozy barrier from nosy neighbors but also add a touch of elegance.
When choosing curtains, it’s important to pick a fabric that can withstand the elements. I found that outdoor fabric works best, and it comes in lots of colors and patterns, so you can really personalize your space. Just make sure to measure your area first to get the right length.
In my experience, hanging the curtains with a simple rod makes it easy to open and close them as needed. This way, you can let in light when you want, but close them for some shade and privacy when you’re relaxing. I love just having my morning coffee outside, feeling all tucked away thanks to those curtains.
Adding some potted plants or a little furniture setup, like those charming chairs in the picture, can make the space feel even more inviting. It’s a simple way to create your own little hideaway without breaking the bank!
Add A Fire Pit

One of the best ways to elevate your patio is by adding a fire pit. I still remember when I first decided to put one in my own backyard. It became an instant gathering place for family and friends. Just imagine, cozying up around the fire, sharing stories, and roasting marshmallows.
In the picture, you can see a lovely setup with a stone fire pit surrounded by comfortable chairs. The warmth of the fire creates a perfect ambiance for evening hangouts. I love how simple it looks but still makes a big impact. Plus, it’s not that hard to set up! You can find many budget-friendly options that fit any style.
When designing your space, think about where you want to place it. I learned the hard way that keeping it away from overhanging branches is important. Safety first! You’ll want a clear area for seating, too. Make sure everyone can gather around comfortably.
For a personal touch, consider adding some blankets or cushions. I throw a few blankets over the chairs for those chilly nights. It makes the space feel so inviting. Lighting some string lights around the area can also add a magical vibe.
Incorporate Vertical Planters

One of the coolest ways to revamp your patio is by adding vertical planters. I recently tried this in my own space, and let me tell you, it’s a total win. The image shows a lovely wooden vertical planter filled with a variety of plants, which instantly adds charm to an otherwise plain wall. I love how it makes the area feel more alive without taking up much floor space.
Vertical planters are super versatile. You can grow herbs, flowers, or even some small veggies if you’re feeling adventurous. I decided to add some herbs like basil and mint, and they not only look good but also come in handy when cooking. Plus, tending to them is a great stress reliever!
Another benefit is that they can fit into smaller patios or balconies where space can be a challenge. You can hang them, lean them against a wall, or even build a custom frame. I found mine at a local hardware store, but you can always DIY one if you’re handy. It’s a fun project that can be done over a weekend!
So if you’re looking to spruce up your patio without breaking the bank, consider incorporating vertical planters. They really do add that touch of greenery and personality that makes your outdoor space feel like an extension of your home.
Refresh Planters With Paint

Giving your planters a fresh coat of paint is a simple way to brighten up your patio. I remember when I decided to tackle this project last summer. It was a fun and creative way to add some personal flair!
First, I gathered my supplies: outdoor paint, brushes, and some old newspapers to protect my workspace. I chose vibrant colors that really popped against the green of my plants. If you have some old terracotta pots lying around, don’t throw them away! Just a bit of paint can turn them into eye-catching pieces.
Before painting, I made sure to clean the pots well. This step is key to getting a smooth finish. After they dried, I just started painting. It felt so rewarding watching them transform right before my eyes.
Once done, I arranged them back on my patio, and it totally changed the vibe. I even added some fun patterns to a couple of pots, which made them even more unique. So, if you’re looking for an easy way to refresh your patio, consider giving your planters a little paint job. You’ll be surprised how much it brightens up the space!
Use Gravel Instead Of Pavers

When it comes to patio makeovers, I’ve found that using gravel instead of pavers is not only budget-friendly, but also gives your space a fresh vibe. Just look at the image! The gravel creates a cozy area where you can relax without breaking the bank.
In my own backyard, I decided to try gravel for my patio. It was super easy to lay down, and I loved how it looked with the stepping stones. The combination really made my outdoor space feel inviting. Plus, I could easily change up the design whenever I wanted!
The best part? Gravel is low-maintenance. Unlike pavers that can shift and crack over time, gravel stays put with just a little care. I just rake it every now and then to keep it looking neat. And if you want to add some greenery, planting flowers or shrubs around the edges blends beautifully with the gravel.
So, if you’re thinking about revamping your patio on a budget, give gravel a shot. It might just be the simple touch you need to make your backyard feel like a getaway!
DIY Candle Lanterns

When I think about sprucing up my patio, DIY candle lanterns always come to mind. They add such a cozy vibe, especially when the sun goes down and the stars come out. Plus, making them is super easy and budget-friendly!
For these lanterns, I use old mason jars. I gather some candles, a bit of twine, and maybe some decorative pebbles for the bottom. Start by placing a candle inside each jar. If you wanna get fancy, you can layer some pebbles or sand at the bottom for an extra touch.
Once your candles are set, I tie some twine around the neck of the jars. It gives them that rustic look that I love. If you have hooks or a tree branch nearby, you can hang them up for a magical glow. I remember one night, sitting on my patio with friends, surrounded by these lanterns, and it felt like we were in our own little fairy tale.
Lighting is everything, right? The soft flicker of the candles against the night sky creates such a warm atmosphere. And if you want to take it a step further, you can string up some fairy lights around your patio. It really brings everything together. So, grab those jars and get crafting—you’ll be so glad you did!
Reuse Crates As Storage

When I decided to give my patio a little makeover, I was on a tight budget. One of the first things I thought of was reusing wooden crates for storage. They can be both practical and stylish, and honestly, they add a rustic charm that’s hard to beat.
In the image, you can see how I stacked these crates against a wall. It’s not just about storage; it also creates a nice display for my plants and other decor. I love how the varying heights and shapes of the crates make everything feel more dynamic. I used some crates for holding garden supplies, while others hold pretty pots and little knick-knacks. It’s amazing what a little organization can do!
To start, I just checked local thrift shops and online marketplaces for affordable crates. Sometimes you can even find them for free! Once I had a few, I gave them a quick sand down to avoid splinters and painted them to match my patio color scheme. Now, they’re not just functional but also look good. I even stacked a few differently to create a unique visual interest.
If you’re looking to add some storage without breaking the bank, I highly recommend giving this a try. You can personalize them to fit your style and needs. Plus, it feels great to reuse items instead of buying new. Let’s be honest, who doesn’t love a good DIY project that’s easy on the wallet?
Create A Shaded Area With A Sail

One of the simplest ways to transform your patio is by adding a shade sail. I remember when I first set mine up; it instantly turned my outdoor space into a cozy retreat. The soft fabric creates a nice contrast against the bright sky, giving you a shaded area that feels inviting.
Choosing the right color for the sail can really change the vibe. I went with a warm beige that blends perfectly with my patio, making it feel more spacious. You can get creative with colors that match your style. A bright shade can add a pop of fun, while softer tones can create a calm atmosphere.
Setting it up is easier than you might think. You just need a few attachment points on your walls or posts. I used some sturdy hooks that I found at a local hardware store, and it held up really well. Just remember to check the tension to avoid sagging, especially during windy days!
Having this shaded area means I can enjoy my patio even during those hot summer afternoons. I love grabbing a book and lounging in my chair without worrying about the sun. Plus, it creates a nice spot for gatherings with friends and family. We sit out there, enjoying snacks and drinks under the sail, which always feels so relaxing.
Paint A Stenciled Design On Concrete

One of the easiest ways to give your patio a fresh look is by painting a stenciled design on the concrete. I remember when I first tried this out; it felt like I was transforming my entire outdoor space without spending a fortune. The image captures that vibe perfectly! The lively stencil pattern adds so much character to the plain concrete, making it feel inviting and lively.
To get started, choose a stencil that speaks to your style. I went with a floral design that complements my plants nicely. After gathering some outdoor paint, a brush, and a few rollers, I prepped the concrete by cleaning it thoroughly. This step is super important! I learned the hard way that dirt can really mess up the paint adhesion.
Next, I laid the stencil down and used a roller to fill in the design. I was a bit nervous at first, but as I saw the pattern emerge, my excitement grew. It’s like watching a piece of art come to life right in front of you. Once the paint dried, I sealed it to protect the design from the weather. Now, whenever I step outside, it feels like I’m walking into a little haven.
So if you’re looking for a fun and budget-friendly way to spice up your patio, I can’t recommend stenciling enough. It’s a simple project that can bring a lot of joy, and there’s something satisfying about DIYing your space!
Add A Folding Table For Flexibility

When I think about making the most of my patio, a folding table always comes to mind. It’s such a simple solution that adds flexibility to the space. In the image, you can see a lovely wooden folding table paired with matching chairs. This setup is not only stylish but also practical. I remember when I first added a folding table to my patio—it totally changed how I used the area.
Having a folding table means I can easily set up for meals, games, or even a little gardening project. If I’m hosting a few friends, I can quickly unfold the table and create an inviting dining space. And when I’m done? I just fold it up and store it away, giving me more room to move around.
One time, I used the table for a cozy brunch with friends. We enjoyed our coffee outside, surrounded by fresh air and nice plants. It was simple, but it felt special. Plus, the folding design made cleanup a breeze!
If you’re considering a patio makeover, think about incorporating a folding table. It adds versatility and can fit any occasion. Plus, it’s budget-friendly! You can find some cute options that won’t break the bank. Trust me, it’s a small addition that makes a big difference in how you enjoy your outdoor space.
Repurpose Indoor Items Outdoors

One of the easiest ways to give your patio a fresh look is by bringing some indoor items outside. I remember when I transformed my old side table into a cute outdoor coffee table. Just a quick coat of exterior paint, and it looked brand new! This not only saved me money but also added a personal touch to my space.
Don’t forget about those extra pillows and blankets lying around. They can turn a simple seating area into a cozy retreat. I grab my living room throw pillows and toss them onto my patio couch. It’s amazing how a pop of color can change the whole vibe!
And if you have some indoor plants that are thriving, why not move them outdoors for the summer? They can liven up your space and create a more inviting atmosphere. I once moved my snake plant outside, and it flourished under the sun!
Be creative with what you’ve got. Old crates can become unique plant stands, and a mismatched collection of mugs can house small succulents. The possibilities are endless, and it’s a fun way to showcase your style without spending a lot.
Use Cinder Blocks For Seating

One of my favorite ways to give my patio a fresh look on a budget is by using cinder blocks for seating. They’re not just for construction; they can actually be pretty stylish! The image shows a setup that’s both functional and inviting. The cinder blocks support wooden planks, creating a solid base for seating. Adding cushions and a cozy throw makes it feel more homey.
When I first tried this, I loved how easy it was to assemble. You just stack the blocks and lay the planks across them. It’s a simple DIY project that doesn’t require any fancy tools or skills. Plus, cinder blocks are super affordable, which is a win for anyone wanting to spruce up their outdoor space without breaking the bank.
Another thing I appreciate about this setup is how versatile it is. You can paint the cinder blocks to match your style or keep them as-is for a more industrial look. I’ve even seen people use them to create planters or shelves. It’s like getting multiple uses from one item!
Don’t forget to think about cushions! They can really transform the look and feel of your seating area. I grab some fun patterned pillows to add a little personality. In the image, you can see how the pillows and the throw really pull the whole setup together.
Overall, using cinder blocks for seating is a smart way to create a comfortable outdoor area. It’s practical, easy, and you can make it your own. I can’t recommend it enough!
Make A Mini Garden Corner

Creating a mini garden corner can be such a fun and easy way to add some life to your patio. In the image, you can see a lovely setup with different potted plants in various shapes and colors. It kinda makes me want to spend more time outdoors just looking at it!
When I decided to make my own mini garden, I started by collecting pots in different sizes. I found some simple terracotta pots that were super cheap at a local store. Then, I filled them with a mix of colorful flowers and easy-care succulents. I love how the greens and pops of color just brighten up the space.
Arranging the pots on a small shelf or a tiered stand, like in the picture, really helps to maximize space. I remember squeezing in as many plants as I could, and it ended up looking really cute. This setup not only saves space but also gives your plants a chance to get the sunlight they need.
Don’t worry if you don’t have a green thumb. Just choose plants that are low-maintenance, like succulents or pothos. They can handle a bit of neglect, which is perfect for busy folks like us. Plus, watering them once a week is no biggie!
Lastly, don’t forget to add some decorative elements. I put in a few stones around my pots and even a small garden gnome for a touch of whimsy. Trust me, a mini garden corner like this can make your patio feel like a tiny oasis.
Create A Wall Art Feature

When I think about sprucing up my patio, one of my favorite ideas is creating a wall art feature. It adds personality and charm without breaking the bank. Just look at the image! The different signs and decorations really make that wall pop. Each piece tells a story, and it’s like the wall has its own character.
We can easily gather a mix of items from thrift stores, garage sales, or even our own homes. I once used an old wooden sign that was gathering dust in my garage, and it became a centerpiece for my patio wall. It’s amazing how just a few pieces can transform a dull space into something inviting.
Arranging the art is a fun part of the process. I lay everything out on the ground first to see how I want it to look. Mixing textures, colors, and shapes can create an interesting display. I even have a few plant pots added which brings a bit of nature into the mix. The best part? If you don’t like the arrangement, just switch it up! It’s all about what makes you happy and fits your style.
Add Solar Garden Lights

When I first thought about sprucing up my patio, one of the simplest things I did was adding solar garden lights. These little lights can totally change the mood of the space, especially as the sun goes down.
Imagine sitting outside with friends on a warm evening, and the soft glow of solar lights creates a cozy atmosphere. It’s like having your own little retreat right in your backyard. I placed mine along the pathway, and they not only look nice but also help guide the way when it’s dark.
Installing these lights is easy-peasy. You don’t need any wiring or special tools. I just stuck them into the ground, and they were ready to go. Plus, they charge during the day and light up automatically at night, which saves electricity. I love that I can enjoy my patio without worrying about the energy bill!
Also, there’s a wide range of styles and designs to choose from. You can find everything from sleek modern options to whimsical fairy-tale designs. I went for a classic look that complements my home, but you can truly let your personality shine through with your choices.
Use Outdoor Throw Pillows

When it comes to sprucing up a patio on a budget, outdoor throw pillows are, in my opinion, a simple yet effective solution. Just look at this cozy setup! The bright colors and fun patterns really draw you in. You can instantly see how pillows can change the vibe of a space. They add comfort and style without breaking the bank.
Personally, I love how easy it is to mix and match different designs. You don’t have to stick to one color scheme. I’ve found that a bold patterned pillow can really pop against a more neutral background. In this image, the pillows feature vibrant hues and interesting shapes, making the patio feel inviting.
Adding pillows also makes it so much more comfortable to lounge outside. I remember when I first added some to my own patio, it felt like a whole new area. We spent many evenings just relaxing, chatting, and enjoying the fresh air, all thanks to those pillows! So, whether you prefer floral prints or geometric designs, pillows are a quick way to elevate your space.
DIY Pebble Mats
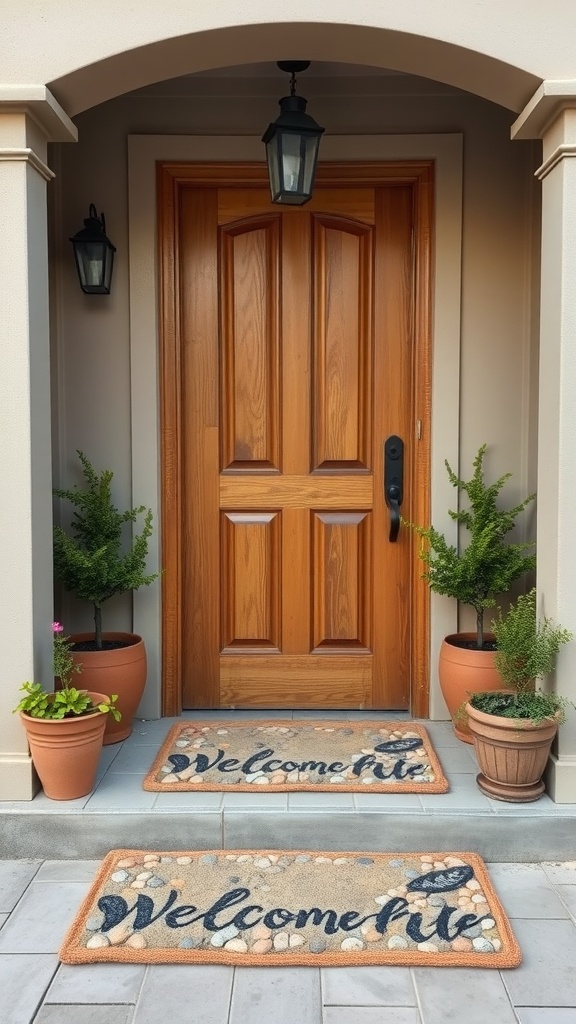
When I first thought about sprucing up my patio area, pebble mats were one of the first ideas that came to mind. They’re not just functional but also add a unique touch to your entryway. The image above shows a lovely entrance with two pebble mats that say ‘Welcome’. It really sets a friendly tone right from the start!
I remember the day I decided to make my own pebble mats. It felt like a fun project that wouldn’t break the bank. All I needed were some flat pebbles, a mat base, and a strong adhesive. The best part? I could choose colors and patterns that matched my style.
Creating these mats was surprisingly easy. First, I laid out my pebbles in a design I liked on the mat base. Then, I carefully glued each stone down, making sure they were secure. After letting it dry, I had a personalized mat that not only looked great but also welcomed guests in a cozy way.
One key tip I learned is to use different sizes and shapes of pebbles for a more interesting look. I found that mixing smooth and rough stones added character. Plus, if you make a mistake, it’s easy to adjust your design on the fly!
If you’re looking for a budget-friendly way to enhance your patio, give DIY pebble mats a try. They add charm and personality without costing a fortune. Plus, it’s a great way to spend a weekend afternoon!