Getting Started with Microsoft Word
Microsoft Word is a powerful tool that allows you to create and edit text documents. To get started with Microsoft Word, you first need to open the application on your device. If you’re using Windows, you can find it under the Start menu, and if you’re using a Mac, you can find it in the Applications folder. Once opened, you’ll be greeted by the Word interface displaying a blank document.
As you work on your document, you may encounter extra pages or blank pages that need removal. To navigate through your document, it’s essential to familiarize yourself with the Ribbon, which is located at the top of the window and contains multiple tabs (e.g., Home, Insert, and View). Feature groups, such as font editing, paragraph formatting, and document views organize the tabs.
When you want to delete a page in your Word document, there are multiple approaches you can take. Your chosen method will depend on whether the page is blank, contains content, or is caused by formatting issues, such as a page break. It’s also essential to understand the Navigation Pane, which can be found under the View tab. This pane allows you to navigate between the pages, headings, and search results within your document.
Remember to save your work periodically by clicking the disk icon or pressing Ctrl+S (Cmd+S on a Mac). This ensures you don’t lose any progress in case of unexpected computer issues or application crashes.
When working with your document, be mindful of editable areas and non-editable areas, such as headers, footers, footnotes, and text fields. When deleting a page, ensure you’re not accidentally deleting desired content within these areas.
In summary, when using Microsoft Word, explore the interface, understand how to navigate through your document, identify the type of extra or blank page, and apply the appropriate method to delete unwanted pages. And don’t forget to save your work frequently to ensure a seamless editing experience.
Pages and Layout in MS Word
Microsoft Word offers numerous tools and features to help you manage pages and overall layouts. This allows you to create professional-looking documents with ease. In this section, we will discuss some basic strategies and functionalities available in MS Word.
Sometimes, you may end up with blank or extra pages that need to be deleted. Deleting a page in Word is simple, and various methods are available for you to do so. Here are a few ways to help you achieve a cleaner and more accurate document layout:
Method 1: Place your cursor at the beginning of the unwanted page. Press the Backspace key until the unwanted page is removed.
Method 2: If you want to delete a specific page, press CTRL + G to open the Go To dialog box. Enter the page number and then press Enter to navigate to the desired page. Click or tap anywhere within the page, and press Delete on your keyboard.
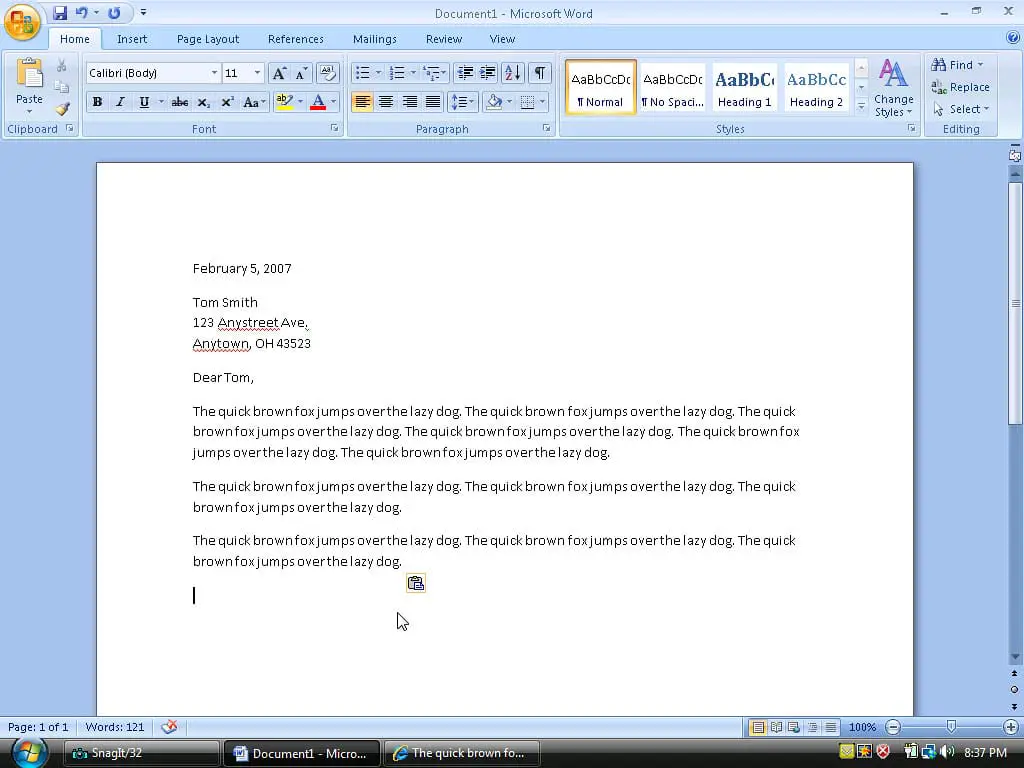
Method 3: To remove a blank page in the middle or at the end of the document, it’s helpful to display paragraph markers by pressing CTRL + SHIFT + 8 or going to the Home tab and clicking the paragraph icon. This allows you to see where you’ve used the Enter key, sometimes leading to accidentally creating blank pages. You can then delete the unwanted paragraph markers.
Remember to consider the readability and overall presentation of your document by using formatting tools, such as tables, bullet points, and text styles when appropriate. Microsoft Word offers a comprehensive suite of functions to cater to your document formatting needs, ensuring a professional, polished result. By taking advantage of these simple steps and the software’s layout tools, you can achieve the desired appearance and organization of your document.
Locating the Unwanted Page
To locate the unwanted page in your Word document, first, click on the View tab at the top of your screen. In the View tab, find and enable the Navigation Pane. This will display a sidebar with three tabs: Headings, Pages, and Results. Click on Pages to see an overview of all the pages in your document.
As you browse through the pages, the active page will be automatically selected. If the unwanted page has content, navigate to that page by using the Navigation Pane or by pressing Ctrl + G (or Cmd + G on a Mac). This will bring up the Go To dialog box, where you can enter the page number and proceed to that page.
In case the unwanted page is blank, it might be added at the end of your document or in between other pages as an extra page. You can identify this without text or other content on the page. Press Ctrl + Shift + 8 (or Cmd + 8 on a Mac) to display paragraph marks, which will help you see if there are any hidden formatting elements on the blank page.
Methods to Delete a Page in MS Word
Using the Backspace Key
To delete a blank page or extra content at the end of your Word document, place your cursor at the bottom, just after the last sentence. Press and hold the Backspace key until all the unwanted content is deleted.
Navigating through the Navigation Pane
Another method to delete a page in Word is to use the Navigation Pane. Follow these steps:
- Click on the View tab and check the box for Navigation Pane.
- In the Navigation Pane, click on the Pages tab to see all the pages in your document.
- Find and click on the page thumbnail for the page you want to delete.
- Press Delete on your keyboard, and the page will be removed.
NOTE: This method works best with blank pages or a page with minimal content.
Removing a Page Break
If you want to delete a page that has a Page Break within your Word document, follow these steps:
- Click on the Home tab in Word if you’re not already there.
- Click on the ¶ symbol to display paragraph marks and hidden formatting symbols.
- Find the Page Break marker and select it.
- Press Delete on your keyboard to remove the Page Break, and the pages will merge.
Remember to hide the paragraph marks and hidden formatting symbols in the Home tab by clicking the ¶ symbol again after you have finished removing the Page Break.
Troubleshooting Deletion Issues
Dealing with Hidden Page Breaks
Sometimes, deleting a page in Word can be challenging when there are hidden page breaks. To tackle this issue, you need to make sure you can view all hidden formatting marks by clicking on the Home tab in the Ribbon and selecting Show/Hide ¶ in the Paragraph group.
Now that you can see all hidden formatting look for any page breaks that might be causing an extra page. If you find any, select and delete them to remove the blank or additional pages.
Managing Text Wrapping Issues
Text wrapping issues can also lead to challenges when trying to delete a page in Word. It’s essential to ensure that the text on your document is not unintentionally extending to the unused page. To fix this issue, follow these steps:
- Press Ctrl+Shift+8 (⌘+8 on a Mac) to show paragraph marks.
- If you find any unnecessary paragraph marks or spaces causing the extra page, select and delete them.
- Adjust the Font size for any overly large paragraph marks by selecting them, typing a smaller value (like 01) inside the Font size box, and then pressing Enter.
These troubleshooting methods should help you deal with and resolve any issues related to deleting unwanted pages in your Word document. Remember always to preview your document before and after making changes to ensure proper formatting and organization.
Advanced Page Deletion Techniques
In this section, we will discuss two advanced techniques for deleting unwanted pages in a Word document. These techniques apply to situations where common methods are ineffective. Please familiarize yourself with the following methods:
Using the Show/Hide Option
The Show/Hide option lets you view non-printing characters such as paragraph marks, spaces, and page breaks, making it easier to detect and delete unwanted pages.
- Click the Home tab in the Ribbon.
- In the Paragraph group, click the Show/Hide button (¶) to reveal hidden formatting elements.
- Locate the unwanted page break or blank page.
- Click on the unwanted formatting element (page break or paragraph mark) and press Delete on your keyboard.
Remember to click the Show/Hide (¶) button again to hide the non-printing characters once you’ve successfully deleted the unwanted page.
Employing the Find and Replace Technique
Another method for deleting unwanted pages is by using the Find and Replace feature in Word. This technique is especially useful when dealing with multiple unwanted page breaks in a document.
- Press Ctrl + H to open the Find and Replace dialog box.
- In the Find what field, enter
^m(caret symbol followed bym). This represents a manual page break. - Leave the Replace with field empty, as you want to replace the page breaks with nothing.
- Click Replace All to remove all manual page breaks in your document, eliminating any unwanted pages caused by these breaks.
With these advanced techniques, you should be able to handle more complex page deletion scenarios in Word and maintain a cleaner, more organized document.
